本文為英文版的機器翻譯版本,如內容有任何歧義或不一致之處,概以英文版為準。
# 在 Service Catalog 中設定 Amazon EMR CloudFormation 範本
本主題假設管理員熟悉 [CloudFormation](https://docs.aws.amazon.com/AWSCloudFormation/latest/UserGuide/Welcome.html)、[產品組合和產品 AWS Service Catalog](https://docs.aws.amazon.com/servicecatalog/latest/adminguide/getstarted-portfolio.html),以及 [Amazon EMR](https://docs.aws.amazon.com/emr/latest/ManagementGuide/emr-gs.html)。
為了簡化從 Studio 建立 Amazon EMR 叢集的操作,管理員可以將 [Amazon EMR CloudFormation 範本](https://docs.aws.amazon.com/AWSCloudFormation/latest/UserGuide/aws-resource-elasticmapreduce-cluster.html)註冊為 [AWS Service Catalog](https://docs.aws.amazon.com/servicecatalog/latest/adminguide/introduction.html) 產品組合中的產品。為了讓資料科學家可以使用範本,他們必須將產品組合與 Studio 或 Studio Classic 中使用的 SageMaker AI 執行角色建立關聯。最後,若要允許使用者探索範本、佈建叢集,以及從 Studio 或 Studio Classic 連線至 Amazon EMR 叢集,管理員需要設定適當的存取許可。
Amazon EMR CloudFormation 範本可讓最終使用者自訂各種叢集層面。例如,管理員可以定義核准的執行個體類型清單,使用者可以在建立叢集時從中選擇執行個體類型。
下列指示會使用端對端 [CloudFormation 堆疊](https://github.com/aws-samples/sagemaker-studio-emr/tree/main/cloudformation/getting_started)來設定 Studio 或 Studio Classic 網域、使用者設定檔、Service Catalog 產品組合,並填入 Amazon EMR 啟動範本。下列步驟強調了管理員必須在其端對端堆疊中套用的特定設定,這些設定可讓 Studio 或 Studio Classic 存取 Service Catalog 產品和佈建 Amazon EMR 叢集。
**注意**
GitHub 儲存庫 [aws-samples/sagemaker-studio-emr](https://github.com/aws-samples/sagemaker-studio-emr/tree/main/cloudformation/getting_started) 包含端對端 CloudFormation 堆疊,其中部署必要的 IAM 角色、聯網、SageMaker 網域、使用者設定檔、Service Catalog 產品組合,以及新增 Amazon EMR 啟動 CloudFormation 範本。這些範本會在 Studio 或 Studio Classic 與 Amazon EMR 叢集之間提供不同的驗證選項。在這些範例中,父系 CloudFormation 堆疊會將 SageMaker AI VPC、安全群組及子網路參數傳遞至 Amazon EMR 叢集範本。
[sagemaker-studio-emr/cloudformation/emr\_servicecatalog\_templates](https://github.com/aws-samples/sagemaker-studio-emr/tree/main/cloudformation/emr_servicecatalog_templates) 儲存庫包含各種範例 Amazon EMR CloudFormation 啟動範本,包括單一帳戶和跨帳戶部署的選項。
如需您可以用來連線至 Amazon EMR 叢集之驗證方法的詳細資訊,請參閱[從 SageMaker Studio 或 Studio Classic 連線至 Amazon EMR 叢集](connect-emr-clusters.md)。
若要讓資料科學家探索 Amazon EMR CloudFormation 範本,並從 Studio 或 Studio Classic 佈建叢集,請遵循下列步驟。
## 步驟 0:檢查您的聯網並準備您的 CloudFormation 堆疊
開始之前:
+ 確定您已檢閱[設定 Amazon EMR 叢集的網路存取](studio-notebooks-emr-networking.md)中的聯網和安全要求。
+ 您必須具有一個現有的端對端 CloudFormation 堆疊,支援您選擇的驗證方法。您可以在 [aws-samples/sagemaker-studio-emr](https://github.com/aws-samples/sagemaker-studio-emr/tree/main/cloudformation/getting_started) 中找到這類 CloudFormation 範本的範例。下列步驟會醒目提示端對端堆疊中的特定組態,讓您可在 Studio 或 Studio Classic 內使用 Amazon EMR 範本。
## 步驟 1:將您的 Service Catalog 產品組合與 SageMaker AI 建立關聯
**在您的 Service Catalog 產品組合中**,將您的產品組合 ID 與存取您叢集的 SageMaker AI 執行角色建立關聯。
若要這麼做,請將以下區段 (此處為 YAML 格式) 新增至您的堆疊。這會授予 SageMaker AI 執行角色存取指定 Service Catalog 產品組合的權限,其中包含 Amazon EMR 範本等產品。它允許 SageMaker AI 擔任的角色啟動這些產品。
將 {{SageMakerExecutionRole.Arn}} 和 {{SageMakerStudioEMRProductPortfolio.ID}} 取代為其實際值。
```
SageMakerStudioEMRProductPortfolioPrincipalAssociation:
Type: AWS::ServiceCatalog::PortfolioPrincipalAssociation
Properties:
PrincipalARN: {{SageMakerExecutionRole.Arn}}
PortfolioId: {{SageMakerStudioEMRProductPortfolio.ID}}
PrincipalType: IAM
```
如需必要 IAM 許可集的詳細資訊,請參閱[許可](#studio-emr-permissions)一節。
## 步驟 2:參考 Service Catalog 產品中的 Amazon EMR 範本
**在產品組合的 Service Catalog 產品**中,參考 Amazon EMR 範本資源,並確保其在 Studio 或 Studio Classic 中的可見性。
若要這樣做,請參考 Service Catalog 產品定義中的 Amazon EMR 範本資源,然後新增下列設定為值 `"true"` 的標籤金鑰 `"sagemaker:studio-visibility:emr"` (請參閱 YAML 格式的範例)。
在 Service Catalog 產品定義中,透過 URL 參考叢集的 CloudFormation 範本。設定為 true 的其他標籤可確保 Studio 或 Studio Classic 中 Amazon EMR 範本的可見性。
**注意**
範例中所提供 URL 參考的 Amazon EMR 範本在啟動時不會強制執行任何驗證要求。此選項用於示範和學習目的。因此不建議用於實際執行環境中。
```
SMStudioEMRNoAuthProduct:
Type: AWS::ServiceCatalog::CloudFormationProduct
Properties:
Owner: AWS
Name: SageMaker Studio Domain No Auth EMR
ProvisioningArtifactParameters:
- Name: SageMaker Studio Domain No Auth EMR
Description: Provisions a SageMaker domain and No Auth EMR Cluster
Info:
LoadTemplateFromURL: {{Link to your CloudFormation template. For example, https://aws-blogs-artifacts-public.s3.amazonaws.com/artifacts/astra-m4-sagemaker/end-to-end/CFN-EMR-NoStudioNoAuthTemplate-v3.yaml}}
Tags:
- Key: "sagemaker:studio-visibility:emr"
Value: "true"
```
## 步驟 3:參數化 Amazon EMR CloudFormation 範本
**用來在 Service Catalog 產品內定義 Amazon EMR 叢集的 CloudFormation 範本**可讓管理員指定可設定的參數。管理員可以在範本的 `Parameters` 區段中定義這些參數的 `Default` 值和 `AllowedValues` 範圍。在叢集啟動過程中,資料科學家可以提供自訂輸入,或從這些預先定義的選項中進行選擇,以自訂其 Amazon EMR 叢集的某些層面。
下列範例說明管理員在建立 Amazon EMR 範本時可設定的其他輸入參數。
```
"Parameters": {
"EmrClusterName": {
"Type": "String",
"Description": "EMR cluster Name."
},
"MasterInstanceType": {
"Type": "String",
"Description": "Instance type of the EMR master node.",
"Default": "m5.xlarge",
"AllowedValues": [
"m5.xlarge",
"m5.2xlarge",
"m5.4xlarge"
]
},
"CoreInstanceType": {
"Type": "String",
"Description": "Instance type of the EMR core nodes.",
"Default": "m5.xlarge",
"AllowedValues": [
"m5.xlarge",
"m5.2xlarge",
"m5.4xlarge",
"m3.medium",
"m3.large",
"m3.xlarge",
"m3.2xlarge"
]
},
"CoreInstanceCount": {
"Type": "String",
"Description": "Number of core instances in the EMR cluster.",
"Default": "2",
"AllowedValues": [
"2",
"5",
"10"
]
},
"EmrReleaseVersion": {
"Type": "String",
"Description": "The release version of EMR to launch.",
"Default": "emr-5.33.1",
"AllowedValues": [
"emr-5.33.1",
"emr-6.4.0"
]
}
}
```
在管理員使 Amazon EMR CloudFormation 範本可在 Studio 內使用之後,資料科學家可以使用它們自行佈建 Amazon EMR 叢集。範本中定義的 `Parameters` 區段會轉換為 Studio 或 Studio Classic 內叢集建立表單上的輸入欄位。對於每個參數,資料科學家可以將自訂值輸入至輸入方塊,或從下拉式功能表中列出的預先定義選項中選取,該值對應至範本中指定的 `AllowedValues`。
下圖顯示了從 CloudFormation Amazon EMR 範本組合的動態表單,以在 Studio 或 Studio Classic 中建立 Amazon EMR 叢集。
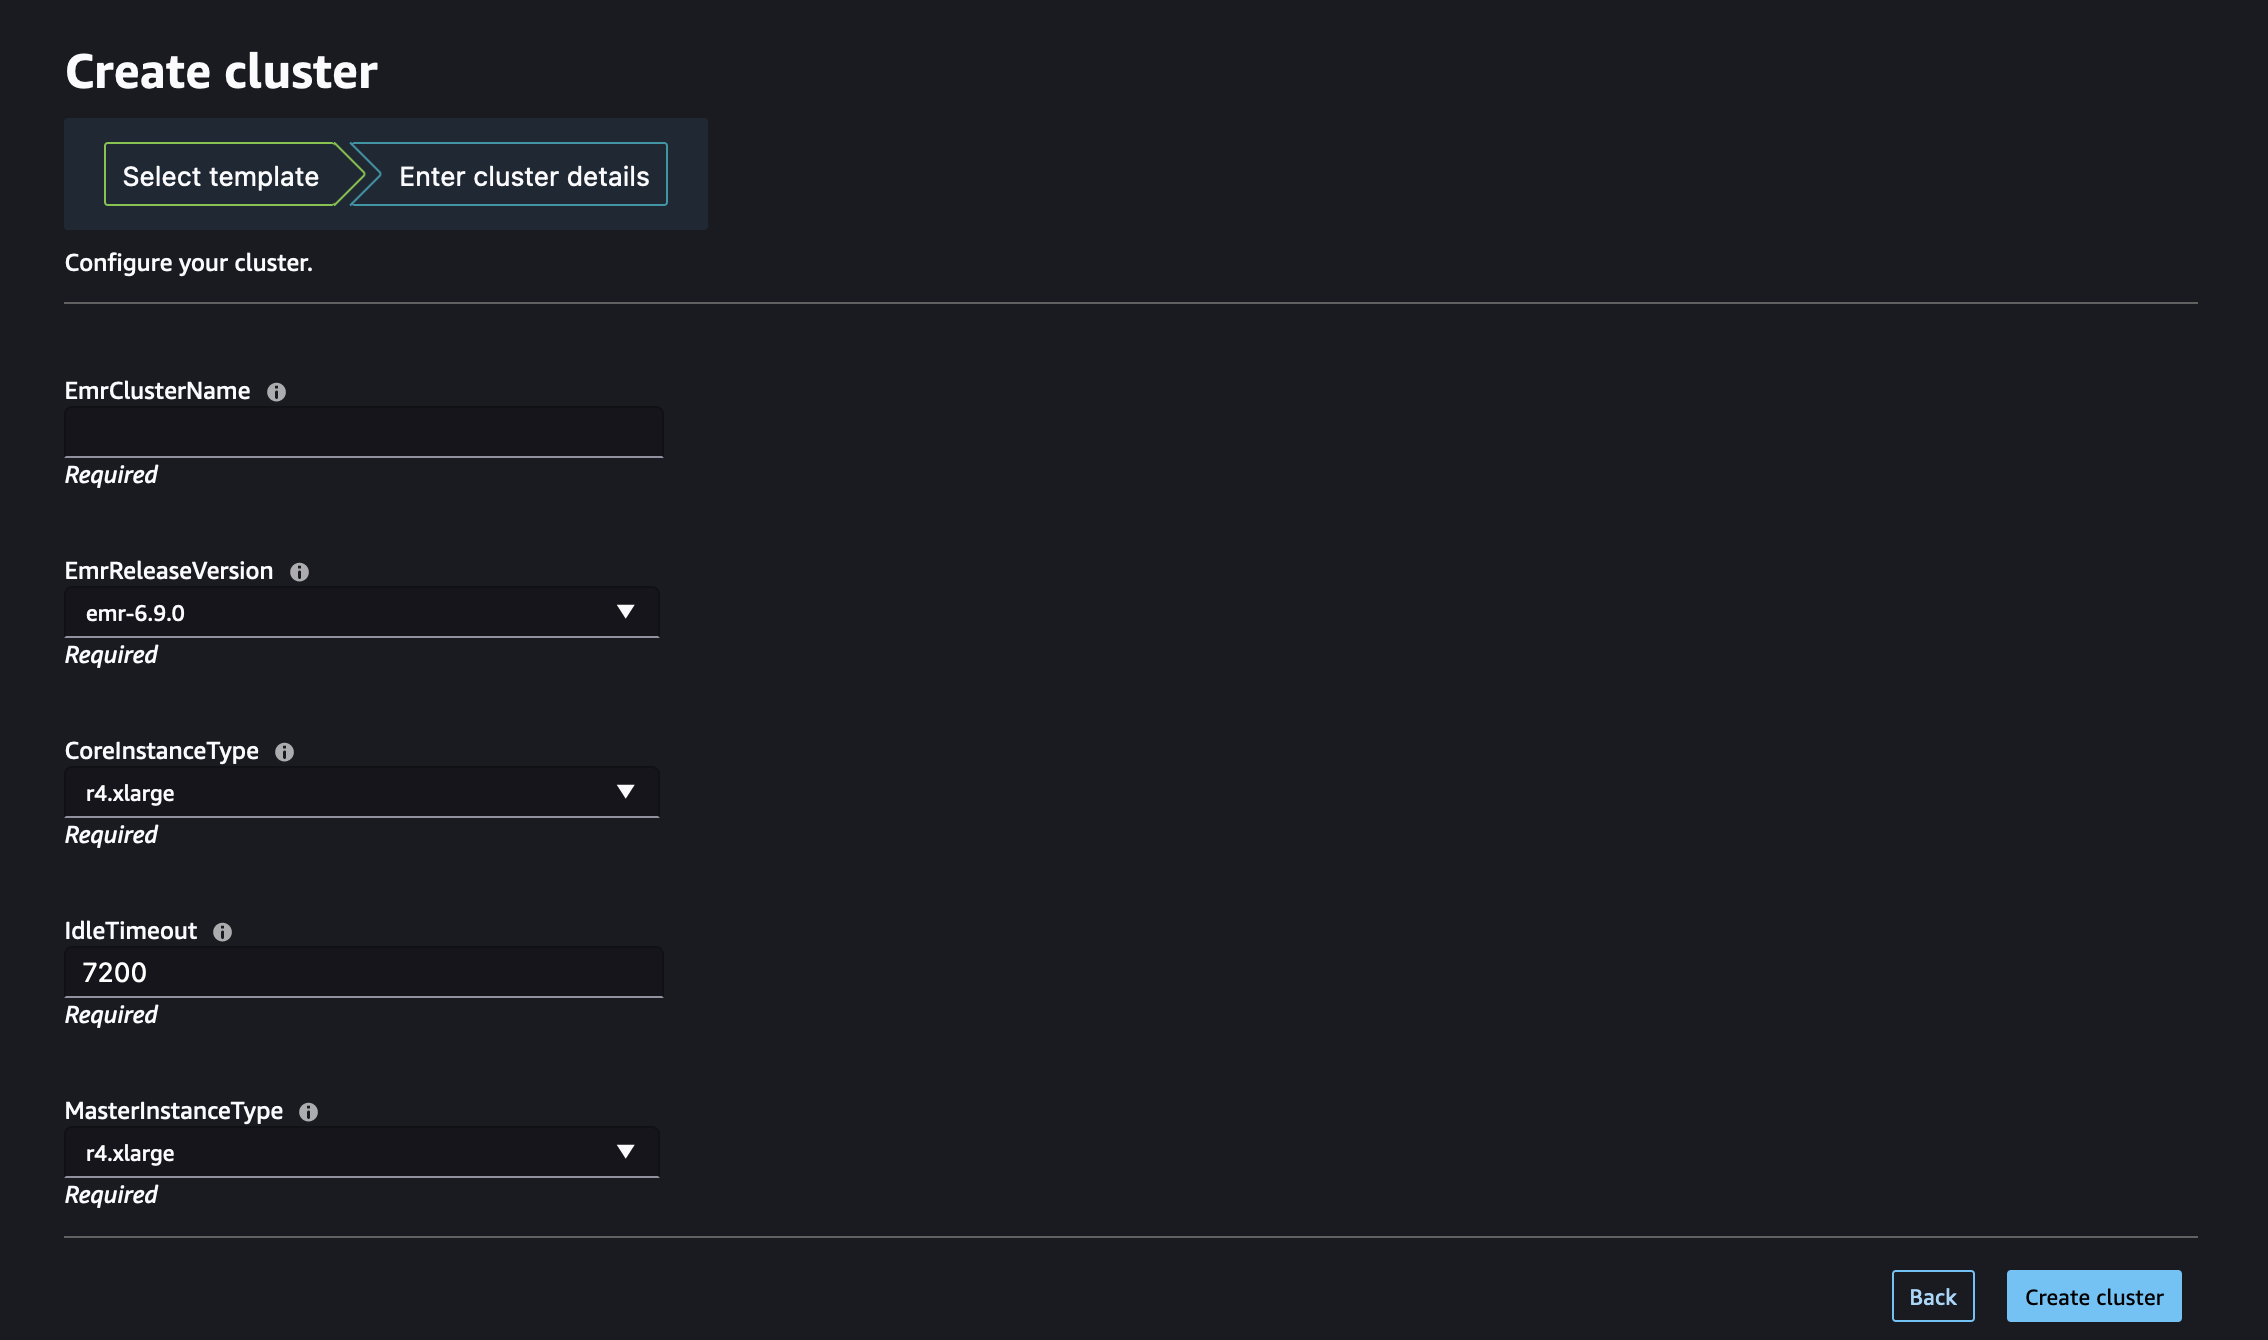
造訪 [從 Studio 或 Studio Classic 啟動 Amazon EMR 叢集](studio-notebooks-launch-emr-cluster-from-template.md) 以了解如何使用這些 Amazon EMR 範本從 Studio 或 Studio Classic 啟動叢集。
## 步驟 4:設定許可,以啟用從 Studio 列出和啟動 Amazon EMR 叢集
最後,連接必要的 IAM 許可,以啟用從 Studio 或 Studio Classic 列出現有的執行中 Amazon EMR 叢集,以及自行佈建新叢集。
您必須將這些政策新增至其中的角色取決於 Studio 及 Amazon EMR 是部署在同一帳戶 (選擇*單一帳戶*) 還是不同帳戶 (選擇*跨帳戶*)。
**重要**
您只能探索並連線至從私有空間啟動的 JupyterLab 和 Studio Classic 應用程式的 Amazon EMR 叢集。確保 Amazon EMR 叢集與您的 Studio 環境位於相同的 AWS 區域。
### 單一帳戶
如果您的 Amazon EMR 叢集和 Studio 或 Studio Classic 部署在同一個 AWS 帳戶中,請將下列許可連接到存取叢集的 SageMaker AI 執行角色。
1. **步驟 1**:擷取私有空間所使用的 SageMaker AI 執行角色 ARN。
如需 SageMaker AI 中空間和執行角色的相關資訊,請參閱 [了解網域空間許可和執行角色](execution-roles-and-spaces.md)。
如需如何擷取 SageMaker AI 執行角色 ARN 的詳細資訊,請參閱 [取得您的執行角色](sagemaker-roles.md#sagemaker-roles-get-execution-role)。
1. **步驟 2**:將下列許可附加至存取 Amazon EMR 叢集的 SageMaker AI 執行角色。
1. 導覽至 [IAM 主控台](https://console.aws.amazon.com/iam)。
1. 選擇**角色**,然後在**搜尋**欄位中依名稱搜尋您的執行角色。角色名稱是 ARN 的最後一部分,在最後一個正斜線 (/) 之後。
1. 遵循角色的連結。
1. 選擇**新增許可**,然後選擇**建立內嵌政策**。
1. 在 **JSON** 索引標籤中,新增允許 Amazon EMR 存取和操作的 Amazon EMR 許可。如需政策文件的詳細資訊,請參閱 [參考政策](studio-set-up-emr-permissions-reference.md) 中的*列出 Amazon EMR 政策*。將陳述式清單複製到角色的內嵌政策之前,請將 `region` 和 `accountID` 取代為其實際值。
1. 選擇**下一步**,然後提供**政策名稱**。
1. 選擇**建立政策**。
1. 重複**建立內嵌政策**步驟,以新增另一個政策,授與執行角色使用 CloudFormation 範本佈建新 Amazon EMR 叢集的許可。如需政策文件的詳細資訊,請參閱 [參考政策](studio-set-up-emr-permissions-reference.md) 中的*建立 Amazon EMRclusters 政策*。將陳述式清單複製到您角色的內嵌政策之前,請將 `region` 和 `accountID` 取代為其實際值。
**注意**
連線至 Amazon EMR 叢集的角色型存取控制 (RBAC) 使用者也應該參閱 [當您的 Amazon EMR 叢集和 Studio 位於相同帳戶時,設定執行期的角色身分驗證](studio-notebooks-emr-cluster-rbac.md#studio-notebooks-emr-cluster-iam-same)。
### 跨帳戶
開始使用之前,請先擷取私有空間所使用的 SageMaker AI 執行角色 ARN。
如需 SageMaker AI 中空間和執行角色的相關資訊,請參閱 [了解網域空間許可和執行角色](execution-roles-and-spaces.md)。
如需如何擷取 SageMaker AI 執行角色 ARN 的詳細資訊,請參閱 [取得您的執行角色](sagemaker-roles.md#sagemaker-roles-get-execution-role)。
如果您的 Amazon EMR 叢集和 Studio 或 Studio Classic 部署在不同的 AWS 帳戶中,您可以在這兩個帳戶上設定許可。
**注意**
連線至 Amazon EMR 叢集的角色型存取控制 (RBAC) 使用者也應該參閱 [當叢集和 Studio 位於不同帳戶時,設定執行期角色驗證](studio-notebooks-emr-cluster-rbac.md#studio-notebooks-emr-cluster-iam-diff)。
#### 在 Amazon EMR 叢集帳戶上
請遵循下列步驟,在部署 Amazon EMR 的帳戶 (也稱為*信任帳戶*) 上建立必要的角色和政策:
1. **步驟 1**:擷取 [Amazon EMR 叢集服務角色](https://docs.aws.amazon.com/emr/latest/ManagementGuide/emr-iam-role.html)的 ARN。
若要了解如何尋找叢集服務角色的 ARN,請參閱[設定 IAM 服務角色以取得 Amazon EMR 對 AWS 服務和資源的許可](https://docs.aws.amazon.com/emr/latest/ManagementGuide/emr-iam-roles.html#emr-iam-role-landing)。
1. **步驟 2**:使用下列組態建立名為 `AssumableRole` 的自訂 IAM 角色:
+ 許可:將必要的許可授與 `AssumableRole`,以允許存取 Amazon EMR 資源。在涉及跨帳戶存取的案例中,此角色也稱為*存取角色*。
+ 信任關係:設定 `AssumableRole` 的信任政策,以允許從需要存取的 Studio 帳戶中擔任執行角色 (跨帳戶圖表中的 `SageMakerExecutionRole`)。
透過擔任該角色,Studio 或 Studio Classic 可以暫時存取其在 Amazon EMR 中所需的許可。
如需如何在 `AssumableRole` Amazon EMR AWS 帳戶中建立新 的詳細說明,請遵循下列步驟:
1. 導覽至 [IAM 主控台](https://console.aws.amazon.com/iam)。
1. 在左側導覽窗格中,選擇**政策**,然後選擇**建立政策**。
1. 在 **JSON** 索引標籤中,新增允許 Amazon EMR 存取和操作的 Amazon EMR 許可。如需政策文件的詳細資訊,請參閱 [參考政策](studio-set-up-emr-permissions-reference.md) 中的*列出 Amazon EMR 政策*。將陳述式清單複製到角色的內嵌政策之前,請將 `region` 和 `accountID` 取代為其實際值。
1. 選擇**下一步**,然後提供**政策名稱**。
1. 選擇**建立政策**。
1. 在左側導覽窗格中,選擇**角色**,然後選擇**建立角色**。
1. 在**建立角色**頁面上,選擇**自訂信任政策**作為信任的實體。
1. 在**自訂信任政策**區段中貼入下列 JSON 文件,然後選擇**下一步**。
------
#### [ For users of Studio and JupyterLab ]
將 `studio-account` 取代為 Studio 帳戶 ID,並將 `AmazonSageMaker-ExecutionRole` 取代為 JupyterLab 空間使用的執行角色。
------
#### [ JSON ]
****
```
{
"Version":"2012-10-17",
"Statement": [
{
"Effect": "Allow",
"Principal": {
"AWS": "arn:aws:iam::{{111122223333}}:role/service-role/{{AmazonSageMaker-ExecutionRole}}"
},
"Action": "sts:AssumeRole"
}
]
}
```
------
------
#### [ For users of Studio Classic ]
將 `studio-account` 取代為 Studio Classic 帳戶 ID。
------
#### [ JSON ]
****
```
{
"Version":"2012-10-17",
"Statement": [
{
"Effect": "Allow",
"Principal": {
"AWS": "arn:aws:iam::{{111122223333}}:root"
},
"Action": "sts:AssumeRole"
}
]
}
```
------
------
1. 在**新增許可**頁面中,新增您剛建立的許可,然後選擇**下一步**。
1. 在**檢閱**頁面上,輸入角色名稱 (例如 `AssumableRole`) 和選用描述。
1. 檢閱角色詳細資訊,並選擇 **Create role (建立角色)**。
如需在 AWS 帳戶建立角色的詳細資訊,請參閱[建立 IAM 角色 (主控台)](https://docs.aws.amazon.com/IAM/latest/UserGuide/id_roles_create_for-user.html)。
#### 在 Studio 帳戶上
在部署 Studio 的帳戶 (也稱為*信任帳戶*) 上,請使用存取信任帳戶中資源所需的許可,更新存取您叢集的 SageMaker AI 執行角色。
1. **步驟 1**:擷取私有空間所使用的 SageMaker AI 執行角色 ARN。
如需 SageMaker AI 中空間和執行角色的相關資訊,請參閱 [了解網域空間許可和執行角色](execution-roles-and-spaces.md)。
如需如何擷取 SageMaker AI 執行角色 ARN 的詳細資訊,請參閱 [取得您的執行角色](sagemaker-roles.md#sagemaker-roles-get-execution-role)。
1. **步驟 2**:將下列許可附加至存取 Amazon EMR 叢集的 SageMaker AI 執行角色。
1. 導覽至 [IAM 主控台](https://console.aws.amazon.com/iam)。
1. 選擇**角色**,然後在**搜尋**欄位中依名稱搜尋您的執行角色。角色名稱是 ARN 的最後一部分,在最後一個正斜線 (/) 之後。
1. 遵循角色的連結。
1. 選擇**新增許可**,然後選擇**建立內嵌政策**。
1. 在 **JSON** 索引標籤中,新增內嵌政策,授與角色更新網域、使用者設定檔和空間的許可。如需政策文件的詳細資訊,請參閱 [參考政策](studio-set-up-emr-permissions-reference.md) 中的*網域、使用者設定檔和空間更新動作政策*。將陳述式清單複製到您角色的內嵌政策之前,請將 `region` 和 `accountID` 取代為其實際值。
1. 選擇**下一步**,然後提供**政策名稱**。
1. 選擇**建立政策**。
1. 重複**建立內嵌政策**步驟,以新增另一個政策,授與執行角色擔任 `AssumableRole` 的許可,然後執行角色存取政策所允許的動作。將 `emr-account` 取代為 Amazon EMR 帳戶 ID,並將 `AssumableRole` 取代為 Amazon EMR 帳戶中建立的可擔任角色名稱。
------
#### [ JSON ]
****
```
{
"Version":"2012-10-17",
"Statement": [
{
"Sid": "AllowRoleAssumptionForCrossAccountDiscovery",
"Effect": "Allow",
"Action": "sts:AssumeRole",
"Resource": [
"arn:aws:iam::{{111122223333}}:role/{{AssumableRole}}"
]
}
]
}
```
------
1. 重複**建立內嵌政策**步驟,以新增另一個政策,授與執行角色使用 CloudFormation 範本佈建新 Amazon EMR 叢集的許可。如需政策文件的詳細資訊,請參閱 [參考政策](studio-set-up-emr-permissions-reference.md) 中的*建立 Amazon EMRclusters 政策*。將陳述式清單複製到您角色的內嵌政策之前,請將 `region` 和 `accountID` 取代為其實際值。
1. (選用) 若要允許列出在與 Studio 相同的帳戶中部署的 Amazon EMR 叢集,請將額外的內嵌政策新增至 Studio 執行角色,如 [參考政策](studio-set-up-emr-permissions-reference.md) 中的*列出 Amazon EMR 政策*所定義。
1. **步驟 3**:將您的可擔任角色 (存取角色) 與您的網域或使用者設定檔建立關聯。Studio 中的 JupyterLab 使用者可以使用 SageMaker AI 主控台或提供的指令碼。
選擇對應至使用案例的索引標籤。
------
#### [ Associate your assumable roles in JupyterLab using the SageMaker AI console ]
若要使用 SageMaker AI 主控台,將您的可擔任角色與使用者設定檔或網域建立關聯:
1. 導覽至 SageMaker AI 主控台,網址為 [https://console.aws.amazon.com/sagemaker/](https://console.aws.amazon.com/sagemaker/)。
1. 在左側導覽窗格中,選擇**網域**,然後使用您更新其許可的 SageMaker AI 執行角色選取網域。
1.
+ 若要在**網域詳細資訊**頁面的**應用程式組態**索引標籤中,將您的可擔任角色 (存取角色) 新增至您的網域,請導覽至 **JupyterLab** 區段。
+ 若要將您的可擔任角色 (存取角色) 新增至您的使用者設定檔:在**網域詳細資訊**頁面上,選擇**使用者設定檔**索引標籤,然後使用您已更新其許可的 SageMaker AI 執行角色選取使用者設定檔。在**應用程式組態**索引標籤中,導覽至 **JupyterLab** 區段。
1. 選擇**編輯**並新增您的可擔任角色 (存取角色) ARN。
1. 選擇**提交**。
------
#### [ Associate your assumable roles in JupyterLab using a Python script ]
在使用您已更新其許可的 SageMaker AI 執行角色,從空間啟動的 JupyterLab 應用程式中,請在終端機中執行下列命令。將 `domainID`、`user-profile-name`、`emr-accountID` 和 `AssumableRole` (`EMRServiceRole` 表示 [RBAC 執行時期角色]()) 取代為其適當的值。此程式碼片段會更新 SageMaker AI 網域內特定使用者設定檔 (使用 `client.update_userprofile`) 或網域設定 (使用 `client.update_domain`) 的使用者設定檔設定。具體而言,它允許 JupyterLab 應用程式擔任 Amazon EMR 帳戶內執行 Amazon EMR 叢集的特定 IAM 角色 (`AssumableRole`)。
```
import botocore.session
import json
sess = botocore.session.get_session()
client = sess.create_client('sagemaker')
client.update_userprofile(
DomainId="{{domainID}}",
UserProfileName="{{user-profile-name}}",
DefaultUserSettings={
'JupyterLabAppSettings': {
'EmrSettings': {
'AssumableRoleArns': ["arn:aws:iam::{{emr-accountID}}:role/{{AssumableRole}}"],
'ExecutionRoleArns': ["arn:aws:iam::{{emr-accountID}}:role/{{EMRServiceRole}}",
"arn:aws:iam::{{emr-accountID}}:role/{{AnotherServiceRole}}"]
}
}
})
resp = client.describe_user_profile(DomainId="{{domainID}}", UserProfileName={{user-profile-name}}")
resp['CreationTime'] = str(resp['CreationTime'])
resp['LastModifiedTime'] = str(resp['LastModifiedTime'])
print(json.dumps(resp, indent=2))
```
------
#### [ For users of Studio Classic ]
將 `AssumableRole` 的 ARN 提供給 Studio Classic 執行角色。ARN 會在啟動時由 Jupyter 伺服器載入。Studio 使用的執行角色擔任該跨帳戶角色,以探索並連線至*信任帳戶*中的 Amazon EMR 叢集。
您可以使用生命週期組態 (LCC) 指令碼來指定此資訊。您可以將 LCC 附加至您的網域或特定使用者設定檔。您使用的 LCC 指令碼必須是 JupyterServer 組態。如需如何建立 LCC 指令碼的詳細資訊,請參閱[搭配 Studio Classic 使用生命週期組態](https://docs.aws.amazon.com/sagemaker/latest/dg/studio-lcc.html)。
下列為範例 LCC 指令碼。若要修改指令碼,請將 `AssumableRole` 和 `emr-account` 取代為其各自的值。跨帳戶的數量限制為五個。
```
# This script creates the file that informs Studio Classic that the role "arn:aws:iam::emr-account:role/AssumableRole" in remote account "emr-account" must be assumed to list and describe Amazon EMR clusters in the remote account.
#!/bin/bash
set -eux
FILE_DIRECTORY="/home/sagemaker-user/.cross-account-configuration-DO_NOT_DELETE"
FILE_NAME="emr-discovery-iam-role-arns-DO_NOT_DELETE.json"
FILE="$FILE_DIRECTORY/$FILE_NAME"
mkdir -p $FILE_DIRECTORY
cat > "$FILE" <<- "EOF"
{
{{emr-cross-account1}}: "arn:aws:iam::{{emr-cross-account1}}:role/AssumableRole",
{{emr-cross-account2}}: "arn:aws:iam::{{emr-cross-account2}}:role/AssumableRole"
}
EOF
```
執行 LCC 並寫入檔案之後,伺服器會讀取檔案 `/home/sagemaker-user/.cross-account-configuration-DO_NOT_DELETE/emr-discovery-iam-role-arns-DO_NOT_DELETE.json` 並儲存跨帳戶 ARN。
------