Implementation examples
This section provides concrete implementation examples for different integration patterns discussed earlier. Each example includes code snippets, configuration steps and practical guidance focused on Moodle as the reference LMS platform.
These examples serve as starting points you can adapt to your specific requirements.
Note
The code snippets below are simplified to make them easier to understand, full working examples can be found at https://github.com/aws-samples/sample-moodle-integrations-on-aws
Moodle direct plugin integration
This example demonstrates how to create a simple block plugin for Moodle. It will follow a use case where a teacher would like to give students access to a translation tool for their French language class.
A complete sample for this pattern is available in the sample-moodle-integrations-on-aws
Moodle Plugin:
/moodle/plugin/blocks/block_aitranslatorAWS Infrastructure (CDK):
/cdk/constructs/moodle_aitranslator.pyAPI Gateway (CDK):
/cdk/constructs/apigateway.pyLambda Authorizer:
/lambda/moodle_authorizerTranslation Lambda:
/lambda/translate
Plugin structure
For this example, we've chosen a block plugin for its flexibility. Note that each plugin type can have a different folder structure and requirements, so make sure to check the Moodle documentation
block_<plugin_name>/
├── block_<plugin_name>.php // Code for the plugin
├── db/
│   └── access.php // Defines access controls on the plugin
├── lang/
│   └── en/
│       └── block_<plugin_name>.php // Language translations, en needed by default
├── settings.php // Form to capture the API Gateway URI during plugin configuration
└── version.php // Required for all plugins, defines plugin version + required moodle ver
As a developer, you can add more files for additional code logic in the plugin. Block plugins are ideal for adding UI components directly into course pages.
Setting up authentication for the plugin
Authenticating a plugin against your backend services is crucial to ensure only authorized users can make calls to your APIs and access AWS resources. In this example we will be using the Token
Plugin code
The block plugin requires 2 functions as part of its structure:
An
init()method which runs on the plugin instantiation. You can use this function to set certain variables, for instance the plugin title.A
get_content()method which runs when the plugin is rendered on the page.
This translates to the following high level implementation code:
//block_translator.php

<?php

require_once($CFG->libdir . '/externallib.php');

class block_aitranslator extends block_base {

    public function get_content() {
        // Here you would typically have code to generate the HTML content for the block


        // Code to handle AJAX request coming from HTML components
        if (!empty($_POST['aitranslator_ajax']) && !empty($_POST['aitranslator_question'])) {

            $question = required_param('aitranslator_question', PARAM_TEXT);

            $response = $this->get_ai_response($question);
            echo htmlentities($response, ENT_QUOTES, 'UTF-8');
            exit;
        }

        return $this->content;
    }
The get_content() methods embeds HTML code in the plugin to display its content. When the AJAX request is made the get_ai_response() method is called which will generate a token for the current user and make the call to the backend with the token included in the Authorization header.
The get_user_token() method is called from get_ai_response() to generate the token:
private function get_user_token() {
    global $DB;

    $service = $DB->get_record('external_services', ['shortname' => 'ai_translator']);

    $tokenobj = external_generate_token_for_current_user($service);

    return $tokenobj->token;
}
In this example the ai_translator service is a custom service that has been configured with appropriately scoped permissions, see Using web services
Setting up the backend
To set up the backend, create an API Gateway REST API.
Once the API is created, create an API Gateway Lambda authorizer. The Lambda function called by the authorizer will make a call back to Moodle using the token for authentication, if successful this validates the request came from the intended Moodle system and the request can be authorized. Additional requests can be made to Moodle to get further information about the user making the request if necessary.
def validate_moodle_token(token: str, moodle_url: str) -> str:
    try:
        # Simple token validation - just check if token is valid
        data = {
            "wstoken": token,
            "wsfunction": "core_webservice_get_site_info",
            "moodlewsrestformat": "json",
        }

        url = f"{moodle_url}/webservice/rest/server.php"

        response = requests.post(url, data=data, timeout=10)
        response.raise_for_status()
        result = response.json()

        # Check for error responses
        if isinstance(result, dict) and ("exception" in result or "error" in result):
            error_code = result.get("errorcode", "unknown")
            error_msg = result.get("message", "Unknown error")
            logger.warning(
                "Token validation failed",
                extra={"error_code": error_code, "error_message": error_msg},
            )
            return None

        # Successful validation - extract username
        username = result.get("username")
        if username:
            return username
The ai_translator custom service must have the function core_webservice_get_site_info associated with it to allow the authorizer to successfully call the Moodle service method.
Then, create a POST method on the API which will be integrated with a Lambda function. Attach the authorizer to the method. For more information on creating APIs and methods, visit the API Gateway documentation.
Create the Lambda function which will call Amazon Bedrock and ask it to translate. Visit Lambda integrations for REST APIs API Gateway to know more about creating the function.
The following high level Python code shows how you can make a call to Amazon Bedrock using data passed by API Gateway.
def call_bedrock(data: str):

    conversation = [
        {
            "role": "user",
            "content": [{"text": """ I would like you to translate the following content into French. Just give me the translation and no more: """ + data}],
        }
    ]
    # Send the message to the model, using a default inference configuration.
    response = client.converse(
        modelId=model_id,
        messages=conversation,
        inferenceConfig={"maxTokens": 512, "temperature": 0.5, "topP": 0.9},
    )

    # Extract the response text.
    response_text = response["output"]["message"]["content"][0]["text"]

    return {'output': response_text}
The code makes use of Bedrock's Converse API to call the model and get a translation.
Packaging
Once the final plugin structure is created it should be a zipped at the block_<plugin_name> level (not the block level) to be ready for installation.
Installation and configuration
There are two methods to install plugins on Moodle that haven't been registered in the Moodle plugins directory:
Uploading a ZIP archive through the user interface
Unzip directly to
/path/to/moodle/blocks/directly on the server(s)
The most appropriate approach will depend on your Moodle environment, see Installing plugins
Once the plugin has been installed it can be configured through Site administration > Plugins > Blocks > plugin_name> which will display the configuration page defined in settings.php
Testing the plugin
Now that all the files have been packaged, the plugin uploaded and installed, you can enable the Moodle Edit Mode
Figure 10: Translation tool powered by Amazon Bedrock
LTI Implementation
This example demonstrates how to create a basic LTI tool that integrates with Amazon Bedrock.
A complete sample for this pattern is available in the sample-moodle-integrations-on-aws
AWS Infrastructure (CDK):
/cdk/constructs/lti.pyAPI Gateway (CDK):
/cdk/constructs/apigateway.pyLambda Backend:
/lambda/ltiReact Frontend:
/lti_frontend
The LTI process works using a handshake system, where both Moodle and the LTI compliant tool talk to each other and exchange information. The following diagram explains the process for LTI Advantage/1.3 (recommended):
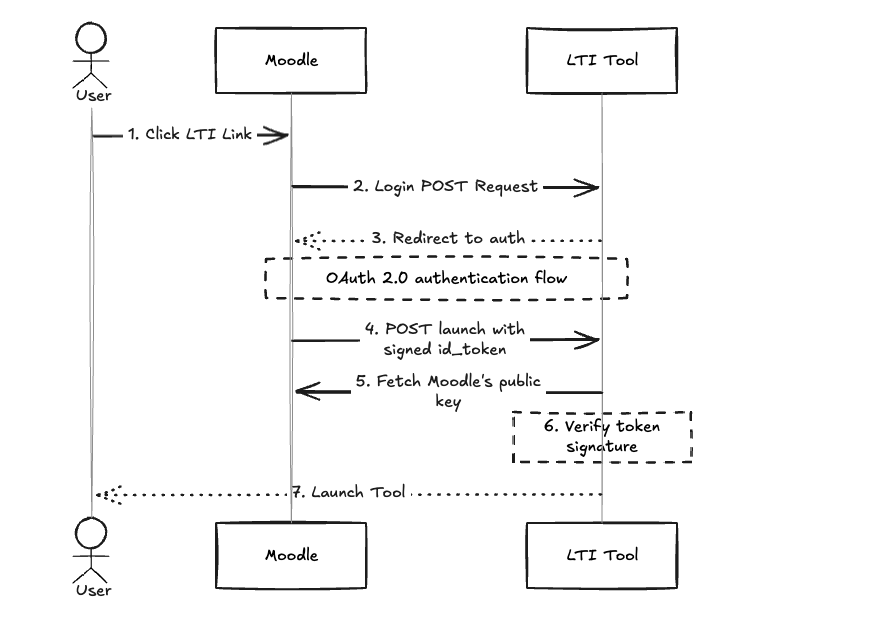
Figure 11: Moodle and LTI Sequence Diagram
The end user, inside Moodle, clicks on a course activity that makes use of a LTI compliant tool. The following sections will explain in more details how the tool can be configured to integrate with Moodle.
Tool registration
When creating a tool, you need to provide Moodle parameters and endpoints which will be used by the LMS to communicate with the tool.
Tool Parameter | Description | Example |
|---|---|---|
Tool URL | The URL of your tool's launch endpoint | https://<id>.execute-api.<region>.amazonaws.com/prod/lti/launch |
Public keyset | The URL of an endpoint which will return a public key | https://<id>.execute-api.<region>.amazonaws.com/prod/lti/key |
Initiate login URL | The URL of your tool's login endpoint | https://<id>.execute-api.<region>.amazonaws.com/prod/lti/login |
Redirect URI (s) | List of URI (s) that Moodle can redirect to. You would usually add here at least your launch URI as Moodle redirects there as part of the handshake process | NA |
Once the tool is registered, Moodle will then provide you with parameters that will need to be used as part of the handshake process.
Moodle Parameter | Description | Example |
|---|---|---|
Client ID | The moodle client ID | 8HG7gkYnkB8nl4r |
Public keyset URL | The URL of an endpoint to retrieve the keys used by Moodle when signing JWT tokens | |
Access token URL | The URL of Moodle's endpoint used when your tool needs to make additional calls back to Moodle (for instance, sending grades back to Moodle) | |
Authentication request URL | The URL of Moodle's auth service |
Login request
When Moodle tries to launch your tool in an iframe/window (depending on the tool configuration), it makes a POST request to your /login endpoint with information such as login_hint (user ID) and lti_message_hint (launch context). The purpose of this endpoint is to redirect back to Moodle's authentication page, passing along these hints along with your tool's client ID and redirect URI.
The following Python code shows how this can be handled using a Lambda function behind a API Gateway /login endpoint. The sample in the repo shows a more complete implementation include Cross-Site Request Forgery (CSRF) protection:
# Extracting login_hint and lti_message_hint from payload
login_hint = event.get("login_hint")[0]
lti_message_hint = event.get("lti_message_hint")[0]

# Generate secure random tokens for CSRF protection
state = str(uuid.uuid4())
nonce = str(uuid.uuid4())

# Generating auth URL with query string parameters
url = (
    f"{OIDC_AUTH_URL}?"
    f"scope=openid&"
    f"response_type=id_token&"
    f"client_id={client_id}&"
    f"redirect_uri={urllib.parse.quote(redirect_url)}&"
    f"login_hint={urllib.parse.quote(login_hint)}&"
    f"state={state}&"
    f"nonce={nonce}&"
    f"response_mode=form_post&"
    f"prompt=none&"
    f"lti_message_hint={urllib.parse.quote(lti_message_hint)}"
)

# Response to redirect to Moodle's auth
return Response(
    status_code=302,
    headers={"Location": url},
    body=""
)
In this code, we use the values Moodle provided for the CLIENT_ID and REDIRECT_URL and constructed a URL with query string parameters to point to Moodle's auth service. Some parameters include:
Response type: In this case id_token asks Moodle's auth to come back with a JWT ID token
Redirect URI: This is the
/launchendpoint that Moodle will redirect to once completing the auth process. This URI must be registered during tool creation (see section Tool registration)
The application running in the iframe is then redirected to the Auth service, which upon completion will do another POST request to the /launch endpoint.
POST request to /launch signed with JWT token
In the POST request Moodle makes to the /launch endpoint, it adds to the payload a JWT token. Decoding this token will provide the LTI tool the ability to extract information about the user launching the tool and the course that it is launched from. It can also decode any custom parameters that Moodle is configured to send to this tool.
The launch endpoint needs to follow these steps:
Verify that the token comes from Moodle. This can be done by getting the key Moodle used to sign the token. This key can be retrieved using the Public keyset URL given by Moodle. Upon retrieving that key, the code can verifies Moodle's signature on the token.
Decode the token and extract relevant information for the tool.
Generate a URL combining the Tool's hosted URL (https://cloudfront-disro.net
for instance) and a session token containing the information retrieved from the JWT token. Redirect the iframe to the generated URL.
The following python code shows how this can be done using Lambdaand API Gateway.
# Extract user information from API Payload
user_info = {
    'user_id': payload.get("user_id"),
    'name': payload.get("name"),
    'email': payload.get("email"),
}

# Generate signed JWT session token
jwt_secret = get_jwt_secret()
token_id = str(uuid.uuid4())
token = jwt.encode(
    {
        **user_info,
        'exp': datetime.now(timezone.utc) + timedelta(seconds=TOKEN_EXPIRY_SECONDS),
        'iat': datetime.now(timezone.utc),
        'jti': token_id
    },
    jwt_secret,
    algorithm='HS256'
)

# Construct the redirect URL
redirect_url = f"{WEBSITE_URL}#token={token}"

return Response(
    status_code=302,
    headers={"Location": redirect_url},
    body=""
)
Tool launch
Once the /launch endpoints completes its processing, it redirects the app in the iframe to the tool's URL, which will allow the user to see and use the tool. The tool is able to display the course it is being launched from as well as the User ID thanks to the session token passed as part of the redirect.
Figure 12: LTI-based Translation tool
The tool can then have its own backend, to talk to services like Amazon Bedrock.
Passing data back to Moodle
The following diagram shows how an LTI compliant tool can pass data back into Moodle. It takes the example of a tool that would like to submit grades back.
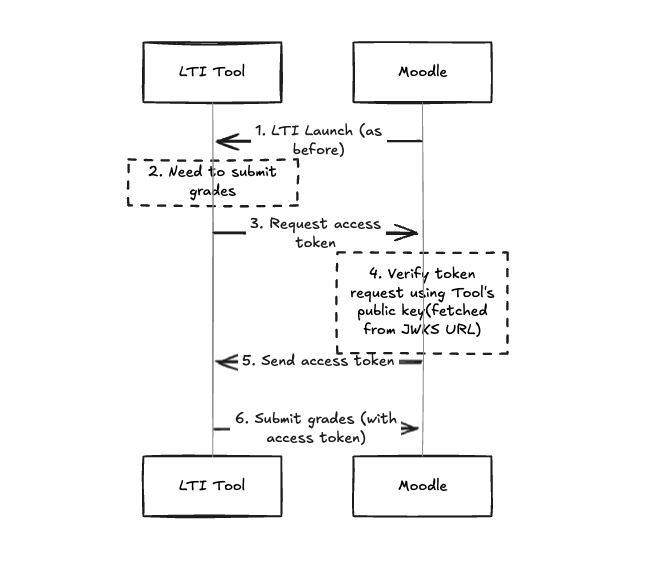
Figure 13: Moodle LTI Sequence Diagram
The LTI tool is launched using the process explained in the previous sections
The tool requests an access token using Moodle's access token URL (provided upon tool registration)
Moodle then checks the request by validating the key against the one returned by the tool's configured Public Keyset URL
Moodle sends an access token back upon successful validation
The tool sends the grades to Moodle using the access token given by Moodle for authentication
Event driven
Educational institutions struggle to deliver timely, accurate information to students, faculty, and staff. Retrieval-Augmented Generation (RAG) services solve this by combining generative AI with institutional knowledge, creating dynamic platforms that retrieve and generate contextual responses.
This section will show how to build a Moodle local plugin that forwards events from the Moodle events system to Amazon EventBridge. The next section (API Integration) will demonstrate how the events can be used to retrieve the content from Moodle and update Amazon Bedrock Knowledge Bases in near real-time. This ensures users access current content while maintaining normal Moodle workflows.
A complete sample for this pattern is available in the sample-moodle-integrations-on-aws
Moodle Plugin:
/moodle/plugin/local/local_awseventsAWS Infrastructure (CDK):
/cdk/constructs/moodle_events.pyEvent Handlers (CDK):
/cdk/constructs/moodle_event_handlers.py
Create the plugin structure
The plugin uses Moodle's local plugin
local_<plugin_name>/
├── classes // Autoloaded classes
│   ├── aws_eventbridge.php // Called by observer to send the event to EventBridge
│   └── observer.php // Invoked as events are observed
├── db
│   └── events.php // Define event subscriptions that the plugin listens for
├── lang
│   └── en
│       └── local_<plugin_name>.php // Language translations, en needed at a minimum
├── settings.php // Define settings for the plugin
└── version.php // Required for all plugins, defines plugin version + required Moodle ver
This structure shows the required files for the plugin to work and be detected by Moodle. As a developer, more files can be added for additional code as required.
Implement the configuration interface
The settings.php file allows an administrator to configure the plugin with the required parameters. The strings are retrieved from the language file.
The code first creates the setting page and adds a number of different options for configuring the plugin. The options would include how to authenticate with the AWS API and the name of the target EventBridge event bus.
Define the event subscriptions
The events.php file is used to configure which events the plugin should process. The snippet below is subscribing to the course_module_created event.
$observers = [
    // Observer for course module created events
    [
        'eventname' => '\core\event\course_module_created',
        'callback'  => '\local_awsevents\observer::process_event',
    ],
];
Process the event
The process_event method of the observer class is invoked for each event that has been subscribed to. The main functionality is to instantiate the aws_eventbridge class and invoke the send_event method.
class observer {

    public static function process_event(\core\event\base $event) {
        global $CFG;

        // Initialize AWS EventBridge handler
        $handler = new aws_eventbridge();

        // Send event to AWS EventBridge
        $result = $handler->send_event($event);

    }
}
Send the event to EventBridge
The constructor in the aws_eventbridge class retrieves the connection details from the CFG object. An EventBridgeClient is created using the AWS SDK for PHP and the event bus name is stored in a local property. The client is declared as a static variable to enable connection reuse across multiple invocations of the observer. This is a performance optimization that prevents the overhead of creating a new AWS SDK client for each event processed.
<?php

namespace local_awsevents;

use Aws\EventBridge\EventBridgeClient;
use core\event\base;

defined('MOODLE_INTERNAL') || die();
class aws_eventbridge {
    /** @var EventBridgeClient Cached AWS EventBridge client instance */
    private static $client = null;
    private $eventbus;

    public function __construct() {
        global $CFG;

        // Initialize client only once (cached across multiple events)
        if (self::$client === null) {
            // Get authentication method
            $auth_method = !empty($CFG->local_awsevents_auth_method) ? $CFG->local_awsevents_auth_method : 'role';
            // Prepare client configuration
            $config = [
                'version' => 'latest',
                'region'  => $CFG->local_awsevents_region
            ];
            // For role authentication, we don't need to specify credentials
            if ($auth_method === 'key') {
                $config['credentials'] = [
                    'key'    => $CFG->local_awsevents_key,
                    'secret' => $CFG->local_awsevents_secret,
                ];
            }

            // Initialize AWS EventBridge client (cached)
            self::$client = new EventBridgeClient($config);
        }

    $this->eventbus = $CFG->local_awsevents_eventbus;
    }
}
The send_event method builds the structure of the payload based on the Moodle event and calls the putEvents method from the EventBridgeClient to write the event to EventBridge. As EventBridge has relatively high service limits for the PutEvents API and is being invoked as a background process without the need to authenticate individual identities in this scenario it is recommended to integrate directly with the AWS service rather than proxying through API Gateway.
public function send_event(base $event): bool {
        global $CFG;

        // Prepare event data
        $eventData = [
            'Entries' => [
                [
                    'EventBusName' => $this->eventbus,
                    'Source' => 'moodle.events',
                    'DetailType' => $event->eventname,
                    'Detail' => json_encode([
                        'eventname' => $event->eventname,
                        'component' => $event->component,
                        'action' => $event->action,
                        'target' => $event->target,
                        'objecttable' => $event->objecttable,
                        'objectid' => $event->objectid,
                        'crud' => $event->crud,
                        'edulevel' => $event->edulevel,
                        'contextid' => $event->contextid,
                        'contextlevel' => $event->contextlevel,
                        'contextinstanceid' => $event->contextinstanceid,
                        'userid' => $event->userid,
                        'courseid' => $event->courseid,
                        'relateduserid' => $event->relateduserid,
                        'anonymous' => $event->anonymous,
                        'other' => $event->other,
                        'timecreated' => $event->timecreated
                    ]),
                    'Time' => new \DateTime()
                ]
            ]
        ];

        // Send event to EventBridge
        $result = $this->client->putEvents($eventData);

        return true;
}
Packaging
As the example plugin has a dependency on the AWS SDK for PHP this needs to be installed with the plugin. There are three approaches for this:
Include AWS SDK for PHP in the plugin: Before creating the ZIP archive of the plugin for installation, the AWS SDK for PHP should be installed into the plugin folder structure. This will lead to a larger plugin but will ensure the version of the AWS SDK for PHP deployed has been tested with the plugin and if the plugin is copied directly to your Moodle servers the dependency is included.
Deploy AWS SDK for PHP during deployment: By adding a
db/install.phpfile to the plugin you can script the installation of the AWS SDK for PHP as your plugin is installed. The script is only called during the installation so depending on the Moodle environment this may not work in multi server environments.Depend on local_aws plugin: The local_aws
plugin installs the the AWS SDK for PHP on the server. Adding a dependency on this in the version.phpfile will ensure it is available before the local plugin can be installed.
Once the final plugin structure is created it should be a zipped at the <plugin_name> level (not the local level) to be ready for installation.
Installation and configuration
There are two methods to install plugins on Moodle that haven't been registered in the Moodle plugins directory:
Uploading a ZIP archive through the user interface
Installation directly on the server(s)
The most appropriate approach will depend on your Moodle environment, see Installing plugins<plugin_name> which will display the configuration page defined in settings.php.
API integration
The previous section described how Moodle events can be sent to EventBridge. This section explains how those events can be used to populate a Amazon Bedrock Knowledge Base which can be used for RAG services.
A complete sample for this pattern is available in the sample-moodle-integrations-on-aws
Lambda Function:
/lambda/index_moodle_fileAWS Infrastructure: Referenced in
/cdk/constructs/moodle_event_handlers.py
Configure EventBridge
The example plugin sends Moodle events to a custom EventBridge event bus. Using a custom event bus for application events is a best practice. Create the event bus by following the Creating an event bus inAmazon EventBridge guide and configure the event bus name in the plugin settings.
The event bus receives Moodle events, this example will focus on events are triggered by a course module being created. Create anEventBridge rule to capture these specific events. A rule contains an event pattern and a target. An example event pattern could be:
{
  "source": ["moodle.events"],
  "detail": {
    "action": ["created"],
    "eventname": ["\\core\\event\\course_module_created"]
  },
}
The aws_eventbridge class in the plugin sets the event source to moodle.events for all events passed to EventBridge. Detail attributes are derived from the original Moodle event. The event pattern can be extended to include other events that are relevant such as:
\core\event\course_module_updated\core\event\course_module_deleted
Create Bedrock Knowledge Base
A Bedrock Knowledge Base can be created following this guide to index and store the generated vectors. A Custom data source type should be selected and AmazonOpenSearch Serverless chosen as the Vector Store.
Configure Moodle
The Lambda function will call the Moodle REST API. To enable this, configure Moodle web services:
Navigate to: Site Administration > Server > Web services > Overview
Complete the following steps:
Enable web services
Enable the REST protocol
Create a user with required capabilities
Create an external service:
Select "Can download files" option
Assign the core_course_get_contents function
Assign the previously created user
Create a token for the service and user
After saving changes, keep the token page open for the next step
Create Secret
Store the Moodle token using AWS Secrets Manager
Lambda Function
The Lambda function processes EventBridge events through these key steps:
Retrieve the Moodle access token from Secrets Manager
def get_moodle_token() -> str:
    """Retrieve Moodle API token from AWS Secrets Manager."""
    response = sm_client.get_secret_value(
        SecretId=os.environ["MOODLE_TOKEN_SECRET_ARN"]
    )
    return response["SecretString"]

TOKEN = get_moodle_token()
Extract course_id and module_id from the event
@event_source(data_class=EventBridgeEvent)
def lambda_handler(
    event: EventBridgeEvent, context: LambdaContext
):
    course_id: int = event.detail["courseid"]
    module_id: int = event.detail["objectid"]
Use Moodle REST API to retrieve the course contents
def get_course_info(course_id: int):
    # Call Moodle web service to get course contents
    response = requests.get(
        f"{MOODLE_URL}/webservice/rest/server.php",
        params={
            "wstoken": TOKEN,
            "wsfunction": "core_course_get_contents",
            "moodlewsrestformat": "json",
            "courseid": course_id,
        },
        timeout=10,
    )
    response.raise_for_status()
    return response.json()
Process the response of
core_course_get_contentsto find the specific module that was passed in the event (note this is implemented at the course level as thecore_course_get_course_moduleAPI does not return details to download the file)Retrieve file download URI and mime type for the files in the module
Download the file from the specified URI and save locally
response = requests.get(f"{file_info.file_url}&token={TOKEN}", timeout=30)
response.raise_for_status()

with open(file_info.file_path, "wb") as f:
      f.write(response.content)
Ingest the file directly into the Amazon Bedrock Knowledge Base
with open(file_info.file_path, "rb") as f:
    file_content = f.read()

# Ingest document into Bedrock Knowledge Base
response = bedrock_agent_client.ingest_knowledge_base_documents(
    knowledgeBaseId=KNOWLEDGE_BASE_ID,
    dataSourceId=DATA_SOURCE_ID,
    documents=[
        {
            "content": {
                "custom": {
                    "customDocumentIdentifier": {"id": file_info.file_url},
                    "inlineContent": {
                        "byteContent": {
                            "data": file_content,
                            "mimeType": file_info.mime_type,
                        },
                        "type": "BYTE",
                    },
                    "sourceType": "IN_LINE",
                },
                "dataSourceType": "CUSTOM",
            }
        }
    ],
)
The Lambda function should be configured with reserved concurrency to prevent excessive API calls to Moodle during multiple content change events.
Next Steps
Review the sample code repository
for complete working implementations of each integration pattern. Identify which integration pattern best fits your use case by referring to the comparison tables in the Integration Options Overview section.
Set up a development environment with a test LMS instance and an AWS account to prototype your chosen pattern.
For production deployments, review the Guidance for Deploying Moodle LMS on AWS
reference architecture.
