Administrator Guide
This section describes the various actions an Administrator can perform using the web UI.
Adding new accounts to the account pool
As an Administrator, you can add new AWS accounts to your account pool using the web UI. Adding new accounts will increase the number of accounts you can lease to your end users, allowing them to work with temporary AWS accounts. After you add new accounts to the account pool, you can lease these accounts to users.
Important
You will need to create the AWS accounts and add them to your organization before adding them to the account pool. The Innovation Sandbox solution cannot create new accounts for you.
-
From the AWS Organizations
console in your org management account, move accounts that you want to onboard into the Entry OU located under the <NAMESPACE>_InnovationSandboxAccountPool OU. This will stage them to be registered with the solution. -
In the solution web UI go to the Administration dropdown and choose Accounts. This will display the Accounts page.
-
From the top right, choose Add accounts. The list of available accounts will only include those located in the Entry OU.
-
From the list of available accounts, choose the accounts you want to add to the Account pool, and choose Register.
-
Review your selections and choose Submit to add the selected accounts to your Account pool.
Resolving Account Cleanup Failures
During the account registration process the sandbox accounts go through an initial cleanup process. In some cases the account may fail cleanup and be placed into the Quarantine status. In most cases the cleanup failure is due to resources created by services that integrate with AWS Organizations that you may have enabled such as AWS CloudTrail, AWS Security Hub, or Amazon GuardDuty.
In the event that the cleanup process fails in your deployment when registering accounts you will need to modify the AWS Nuke configuration file to filter out the protected resources.
First we must discover the resources that should be ignored for your environment:
-
In the Hub account navigate to the AWS Step Functions console
and choose the account cleaner state machine starting with AccountCleanerStepFunctionStateMachine. -
Choose one of the recent executions with a Failed status.
-
From the Details tab, copy the executionId provided at the top of the page (It will be in a format like xxxxxxxx-xxxx-xxxx-xxxx-xxxxxxxxxxxx_xxxxxxxx-xxxx-xxxx-xxxx-xxxxxxxxxxxx).
-
Navigate to the Amazon CloudWatch Logs Insights console
. -
Choose Saved and sample queries from the menu on the right.
-
Expand the group name ISB-<namespace> and choose the AccountCleanupLogs query.
-
In the query editor replace the PasteStateMachineExecutionIdHere text with the executionId you copied previously.
-
Ensure that the time range you selected includes the time of the cleanup failure.
-
Choose Run query, this will display any resources that failed to be cleaned up.
-
Make a note of any of the resource types in the resourceType column that should be filtered out.
Now we must update the AWS Nuke configuration file to ignore these resources:
-
In the Hub account navigate to the applications page in the AWS AppConfig console
. -
Choose the application starting with InnovationSandboxData-Config-Application.
-
Choose the configuration profile starting with InnovationSandboxData-Config-NukeConfigHostedConfiguration. This is the AWS Nuke config file for the solution.
-
To update the configuration file choose Create version.
-
Use the resource types noted in the previous steps to modify the filter to ignore them. Refer to the AWS Nuke Config documentation
for details on how to update filters. -
Once you have made your modifications, choose Create hosted configuration version.
-
Then choose Start deployment to update the nuke configuration for the solution.
Assuming you have appropriately modified the filters for your environment you can now retry the cleanup process:
-
Return to the solution web UI and navigate to the Accounts page.
-
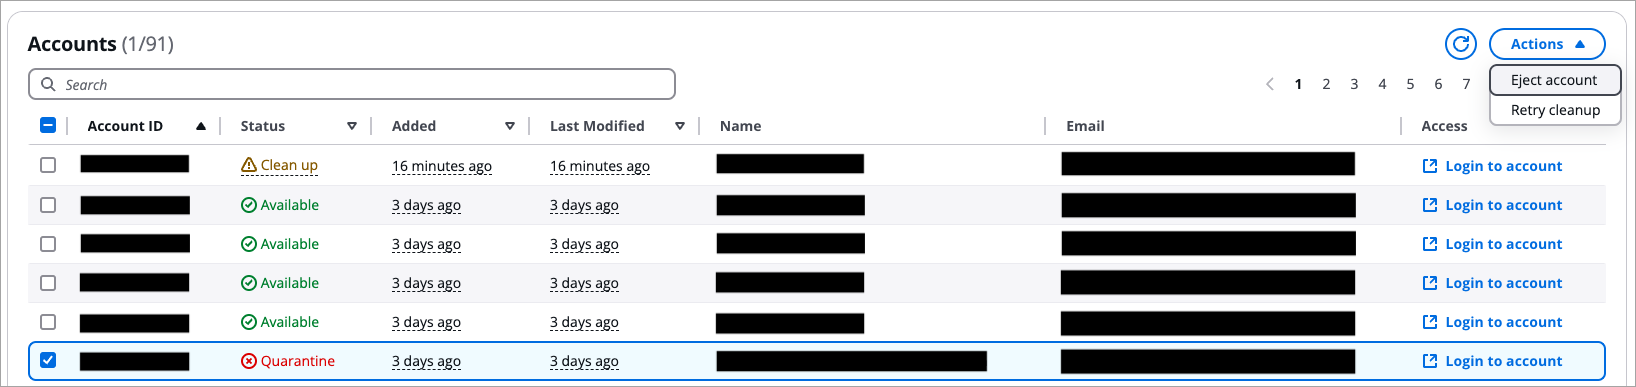
Select any accounts that are in the Quarantine status.
-
Under the Actions menu, choose Retry cleanup.
This will reinvoke the cleanup process on the account with the new AWS Nuke configurations.
Note
If the cleanup process continues to fail, you may have missed a resource that needs to be filtered out. Repeat the previous steps to add the appropriate filters to your AWS Nuke config file for other resources failing the cleanup that should be filtered out.
Account states in Innovation Sandbox
This table explains the various states the account can be in at any given time. Administrators (or anyone) cannot change these states manually.
| State | Description |
|---|---|
|
Available |
The account is in the pool and ready to be used as part of a lease. |
|
Active |
The account is being used for a lease. |
|
Frozen |
The account is being used for a lease but the user no longer has access to the account. Administrators and Managers can still access the account for evaluation and review purposes. Note: This is an optional state. You will need to configure the account to freeze during the lease template creation. See Creating and managing lease templates for more information. |
|
CleanUp |
The account is going through the clean-up process. |
|
Quarantine |
Accounts that fail to complete the automated clean-up will be quarantined and an Admin will need to manually resolve any resources that failed to delete. After manual remediation, the account will go back into the clean-up state for a final clean-up process. |
Account lifecycle in Innovation Sandbox
For more information, refer to the Account lifecycle section.
Managing existing accounts
As an Administrator, you can manage any existing accounts. This allows you to manually perform account lifecycle actions such as removing accounts from the pool, and retrying the clean-up process.
Account management options
To manage accounts:
-
From the Administration dropdown, navigate to the Accounts page.
-
Select the accounts you want to manage to enable the Actions dropdown. Using the Actions dropdown, you can perform these actions for the selected accounts.
| Action | Description |
|---|---|
|
Eject account |
Removes the account from the pool of available accounts. Note: Administrators can also eject in-use accounts. For example, they might want to preserve work beyond the lease or move the account away from the management provided by Innovation Sandbox. |
|
Retry cleanup |
Restarts the clean-up process for that account. By default, lapsed or inactive accounts will be cleaned on a periodic basis. If an account cannot be cleaned, Administrators can manually resolve any issues, and use this option to restart the clean-up process. For example, for accounts in a Quarantine state. |
Registering and managing blueprints
As an Administrator, you can register CloudFormation StackSets as blueprints to provide pre-configured infrastructure to sandbox accounts. Blueprints enable users to receive accounts with ready-to-use resources, reducing manual setup.

Blueprints page
Blueprints are optional. You must create self-managed CloudFormation StackSets outside of Innovation Sandbox before registering them as blueprints.
Creating self-managed StackSets
Before registering blueprints, create self-managed CloudFormation StackSets in your hub account (the AWS account where Innovation Sandbox is deployed).
Prerequisites:
-
A CloudFormation template that defines the infrastructure to deploy to sandbox accounts
-
IAM roles for cross-account deployment — the solution creates
InnovationSandbox-{NAMESPACE}-IntermediateRole(administration role) andInnovationSandbox-{NAMESPACE}-SandboxAccountRole(execution role) -
Knowledge of your infrastructure requirements and target regions
Example: Create a StackSet using AWS CLI
aws cloudformation create-stack-set \
  --stack-set-name my-blueprint-stackset \
  --template-url https://s3.us-east-1.amazonaws.com/my-bucket/my-template.yaml \
  --administration-role-arn arn:aws:iam::{ACCOUNT-ID}:role/InnovationSandbox-{NAMESPACE}-IntermediateRole \
  --execution-role-name InnovationSandbox-{NAMESPACE}-SandboxAccountRole \
  --managed-execution Active=true \
  --capabilities CAPABILITY_IAM \
  --description "My blueprint infrastructure"
Replace {ACCOUNT-ID} with your hub account ID and {NAMESPACE} with your solution namespace.
Tip
The --managed-execution Active=true flag enables managed execution on your StackSet. This allows CloudFormation to run non-conflicting operations concurrently and automatically queue conflicting operations, preventing deployment bottlenecks when multiple leases are approved simultaneously.
Note
Do not add deployment targets or specify accounts when creating the StackSet. Innovation Sandbox manages StackSet instance creation automatically when leases are approved.
Blueprint prerequisites
Before registering blueprints, ensure you meet these requirements:
StackSet Requirements: * StackSet must use SELF_MANAGED permission model * StackSet must be in ACTIVE status * StackSet template must be valid and tested
Template Validation: * Test StackSet deployment to a test account before registration * Verify template completes within your desired timeframe * Ensure template is idempotent (can be deployed multiple times safely) * Validate template works across all target regions
To validate your StackSet before registration:
-
Sign in to the CloudFormation console
. -
Navigate to StackSets and locate your StackSet.
-
Verify the StackSet status shows ACTIVE.
-
Check that the permission model shows SELF_MANAGED.
-
Verify the IAM roles match the recommended ISB role names:
-
Administration Role:
InnovationSandbox-{NAMESPACE}-IntermediateRole -
Execution Role:
InnovationSandbox-{NAMESPACE}-SandboxAccountRole
-
-
Review recent operations to ensure successful deployments.
-
Test deployment to a sandbox account manually before registering as blueprint.
Note
For detailed StackSet creation steps, refer to Creating self-managed StackSets.
Important
Test your StackSet deployment before registering it as a blueprint. Untested StackSets may fail during lease provisioning and prevent users from accessing their accounts. Avoid hardcoding credentials or sensitive data in templates — use AWS Secrets Manager or Parameter Store instead. For general template security guidance, refer to AWS CloudFormation security best practices.
Registering a new blueprint
To register a blueprint using the registration wizard:
-
From the Administration dropdown, choose Blueprints.
-
Choose Register blueprint.
-
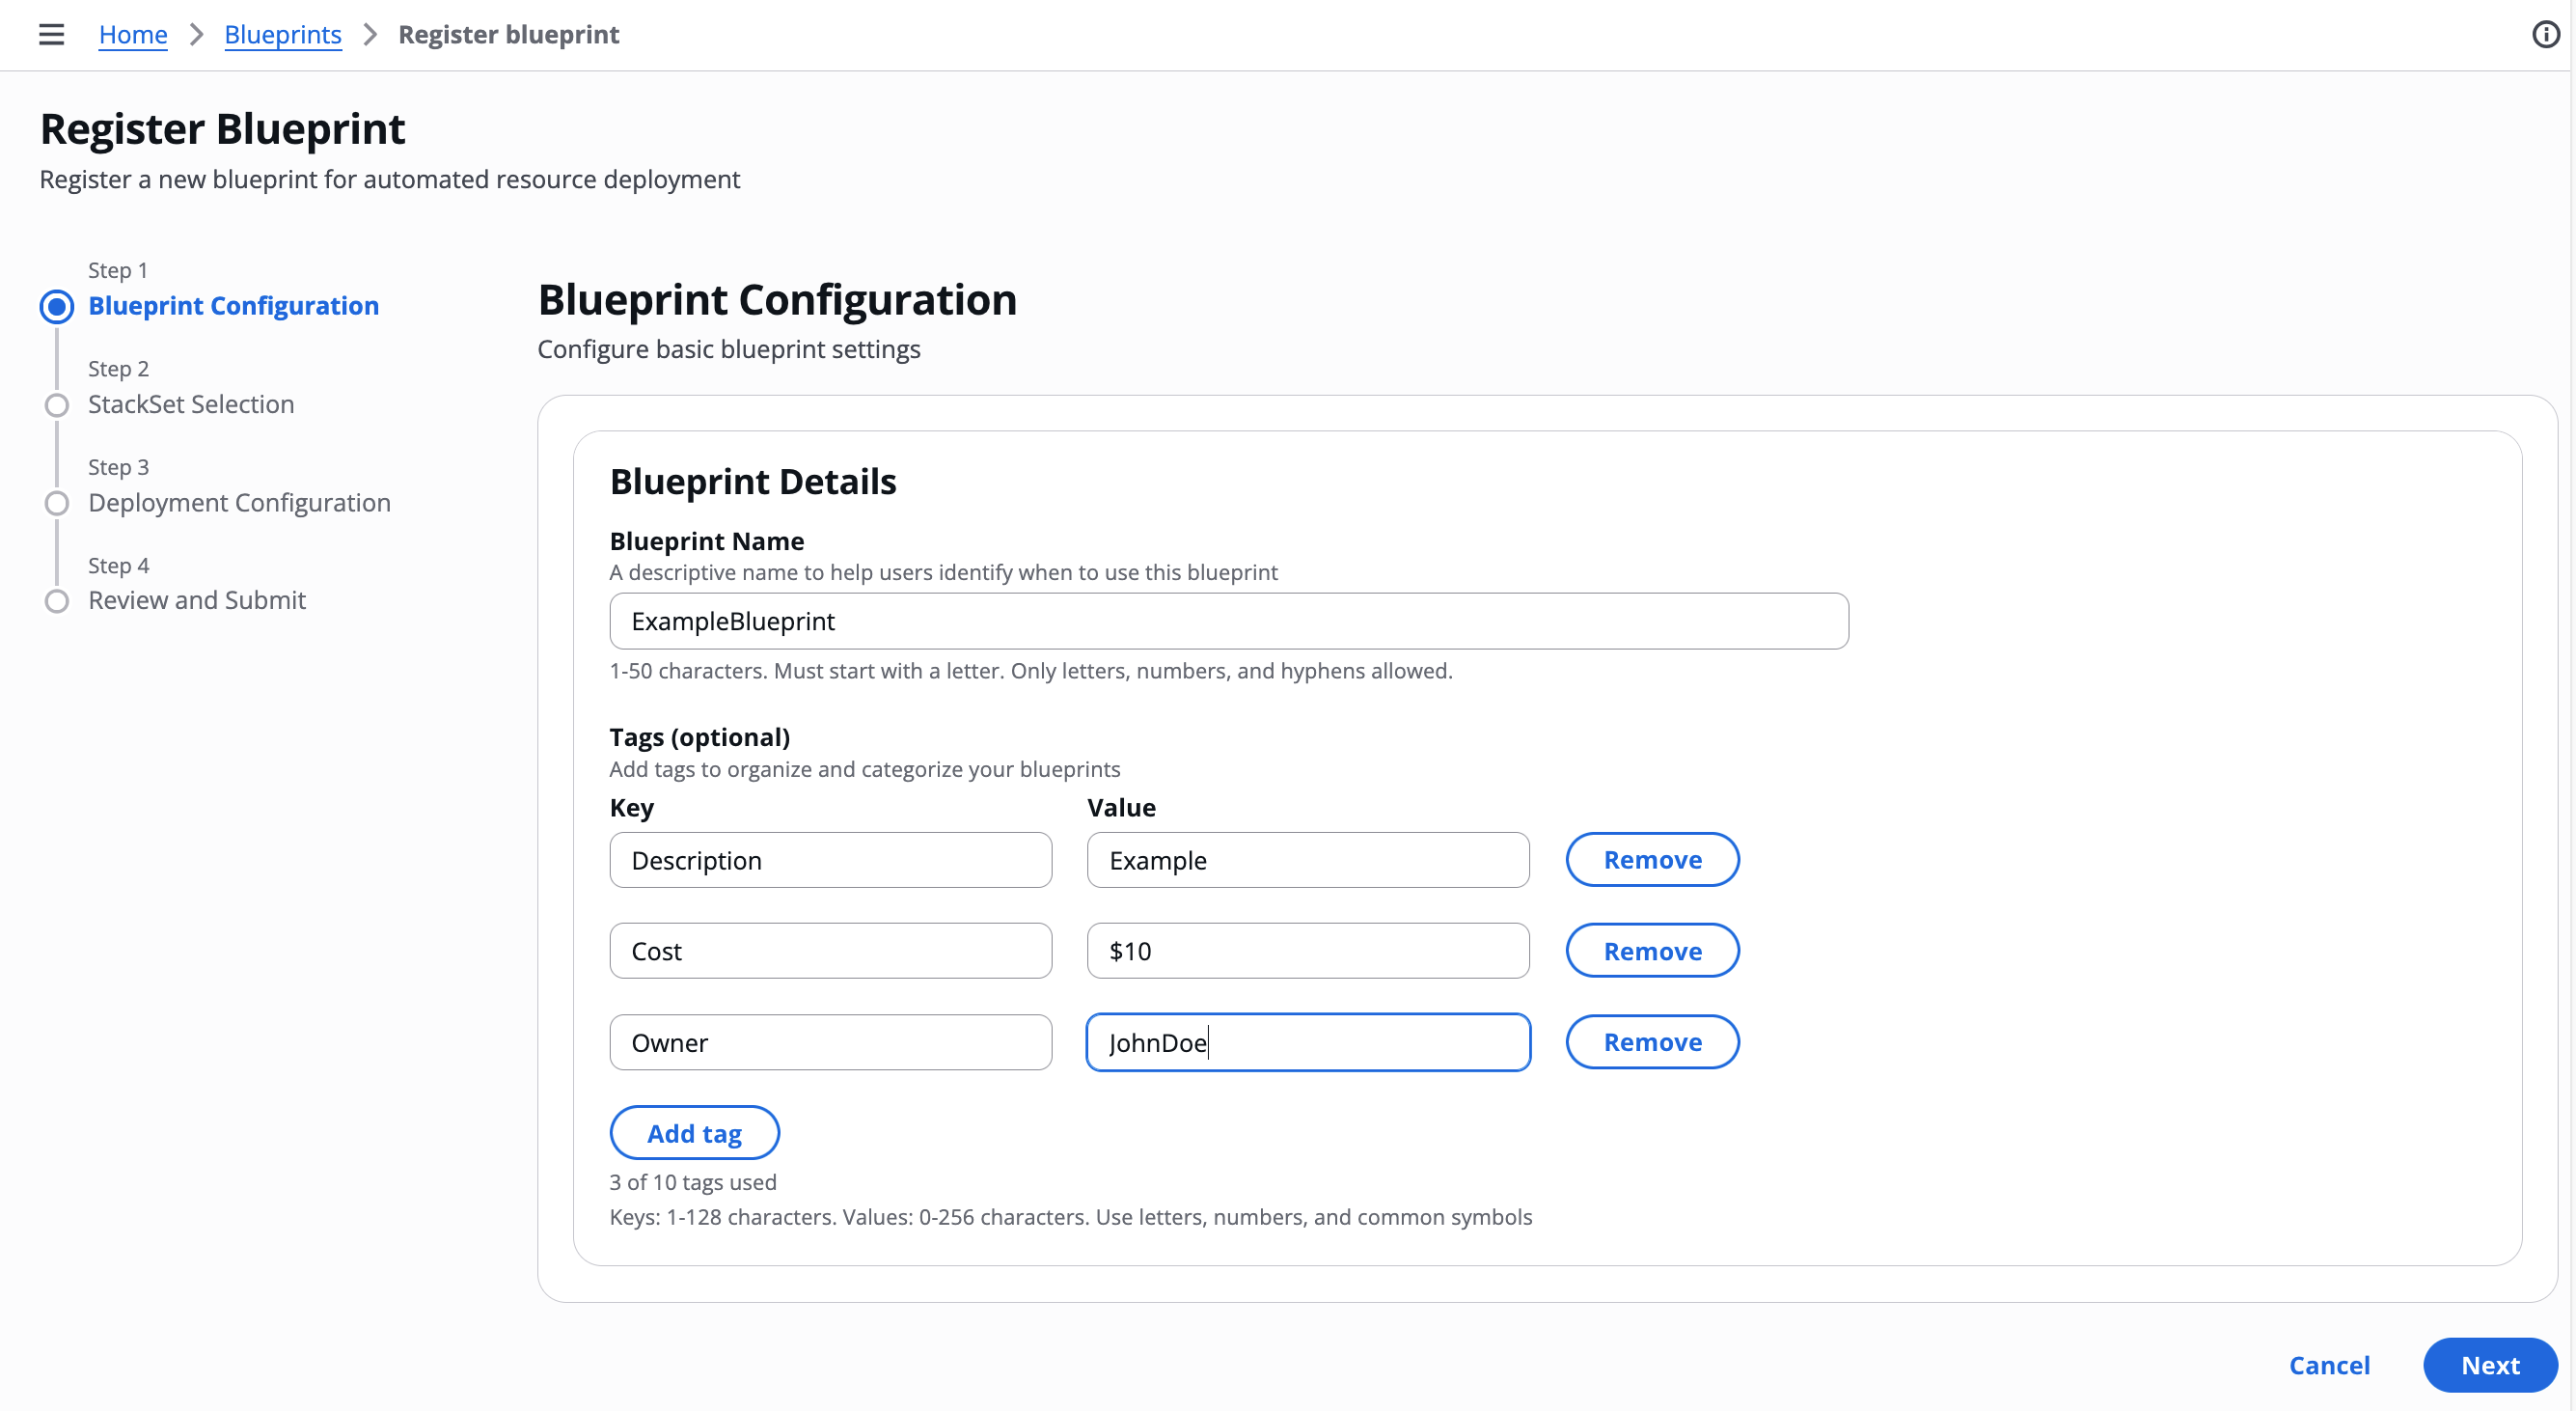
On the Blueprint Configuration page, complete the required fields:
-
For Name, enter a descriptive name (1-50 characters).
-
(Optional) Add tags to provide metadata such as estimated cost, description, or support contact.
-
Choose Next.
-
-
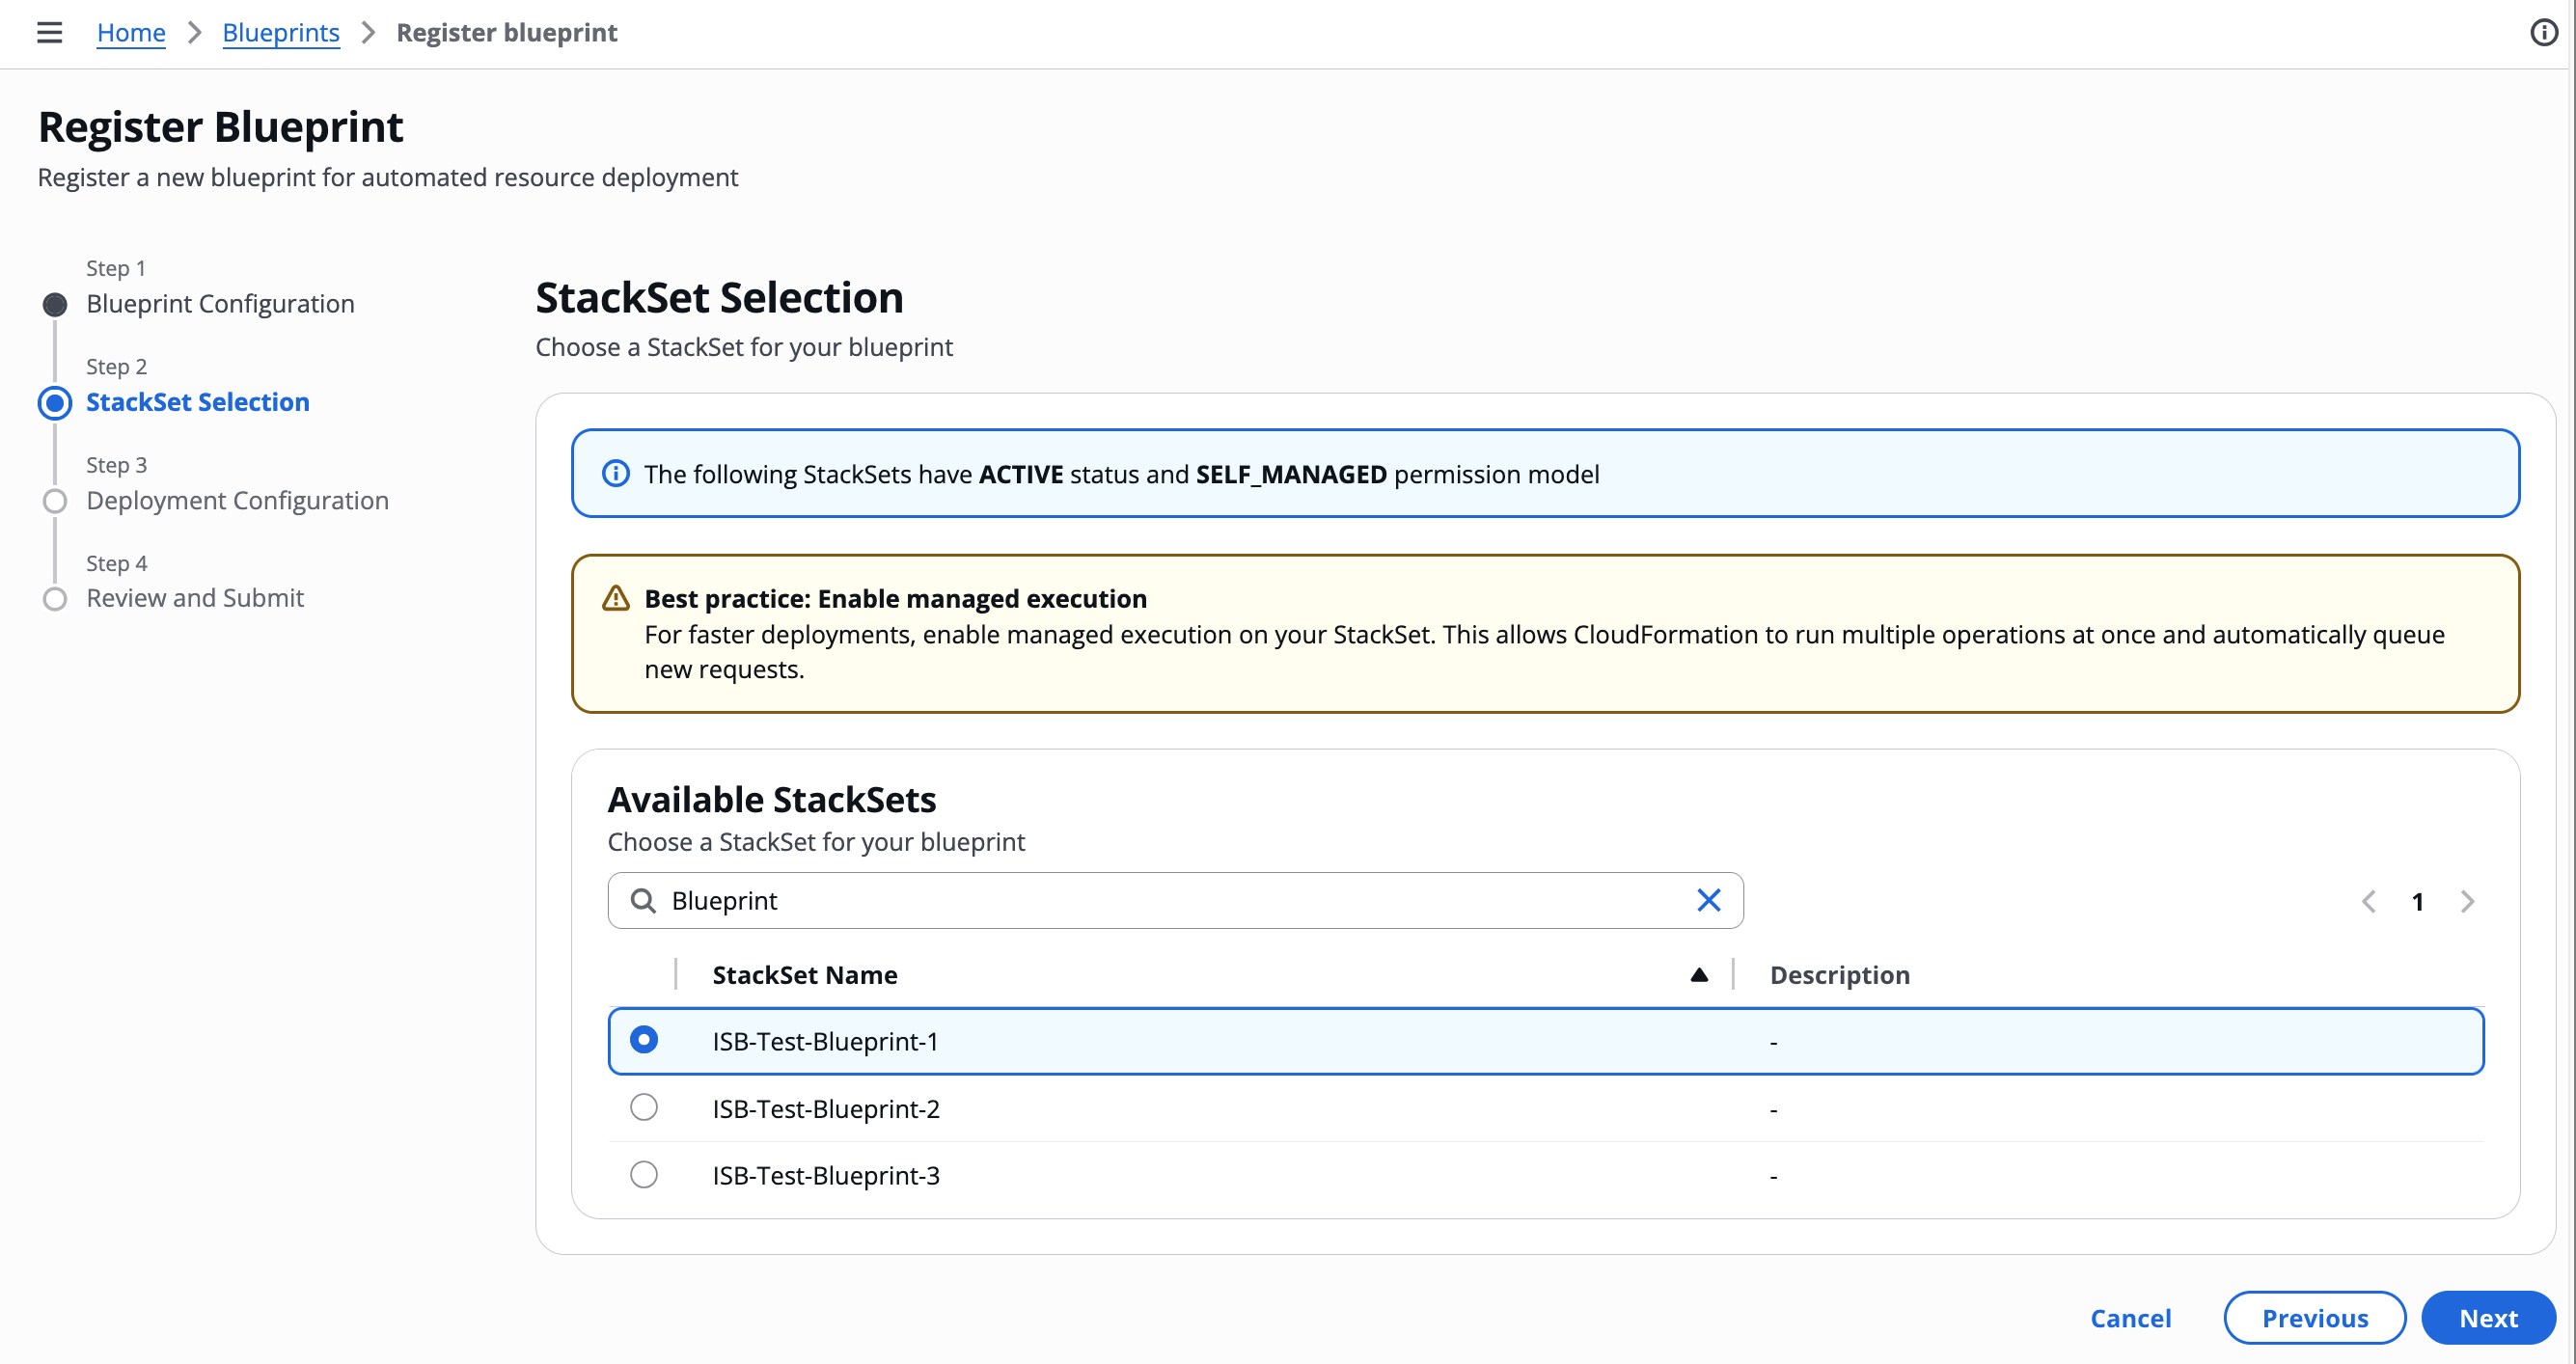
On the StackSet Selection page:
-
Select the StackSet you want to register as a blueprint from the list.
-
Choose Next.
-
-
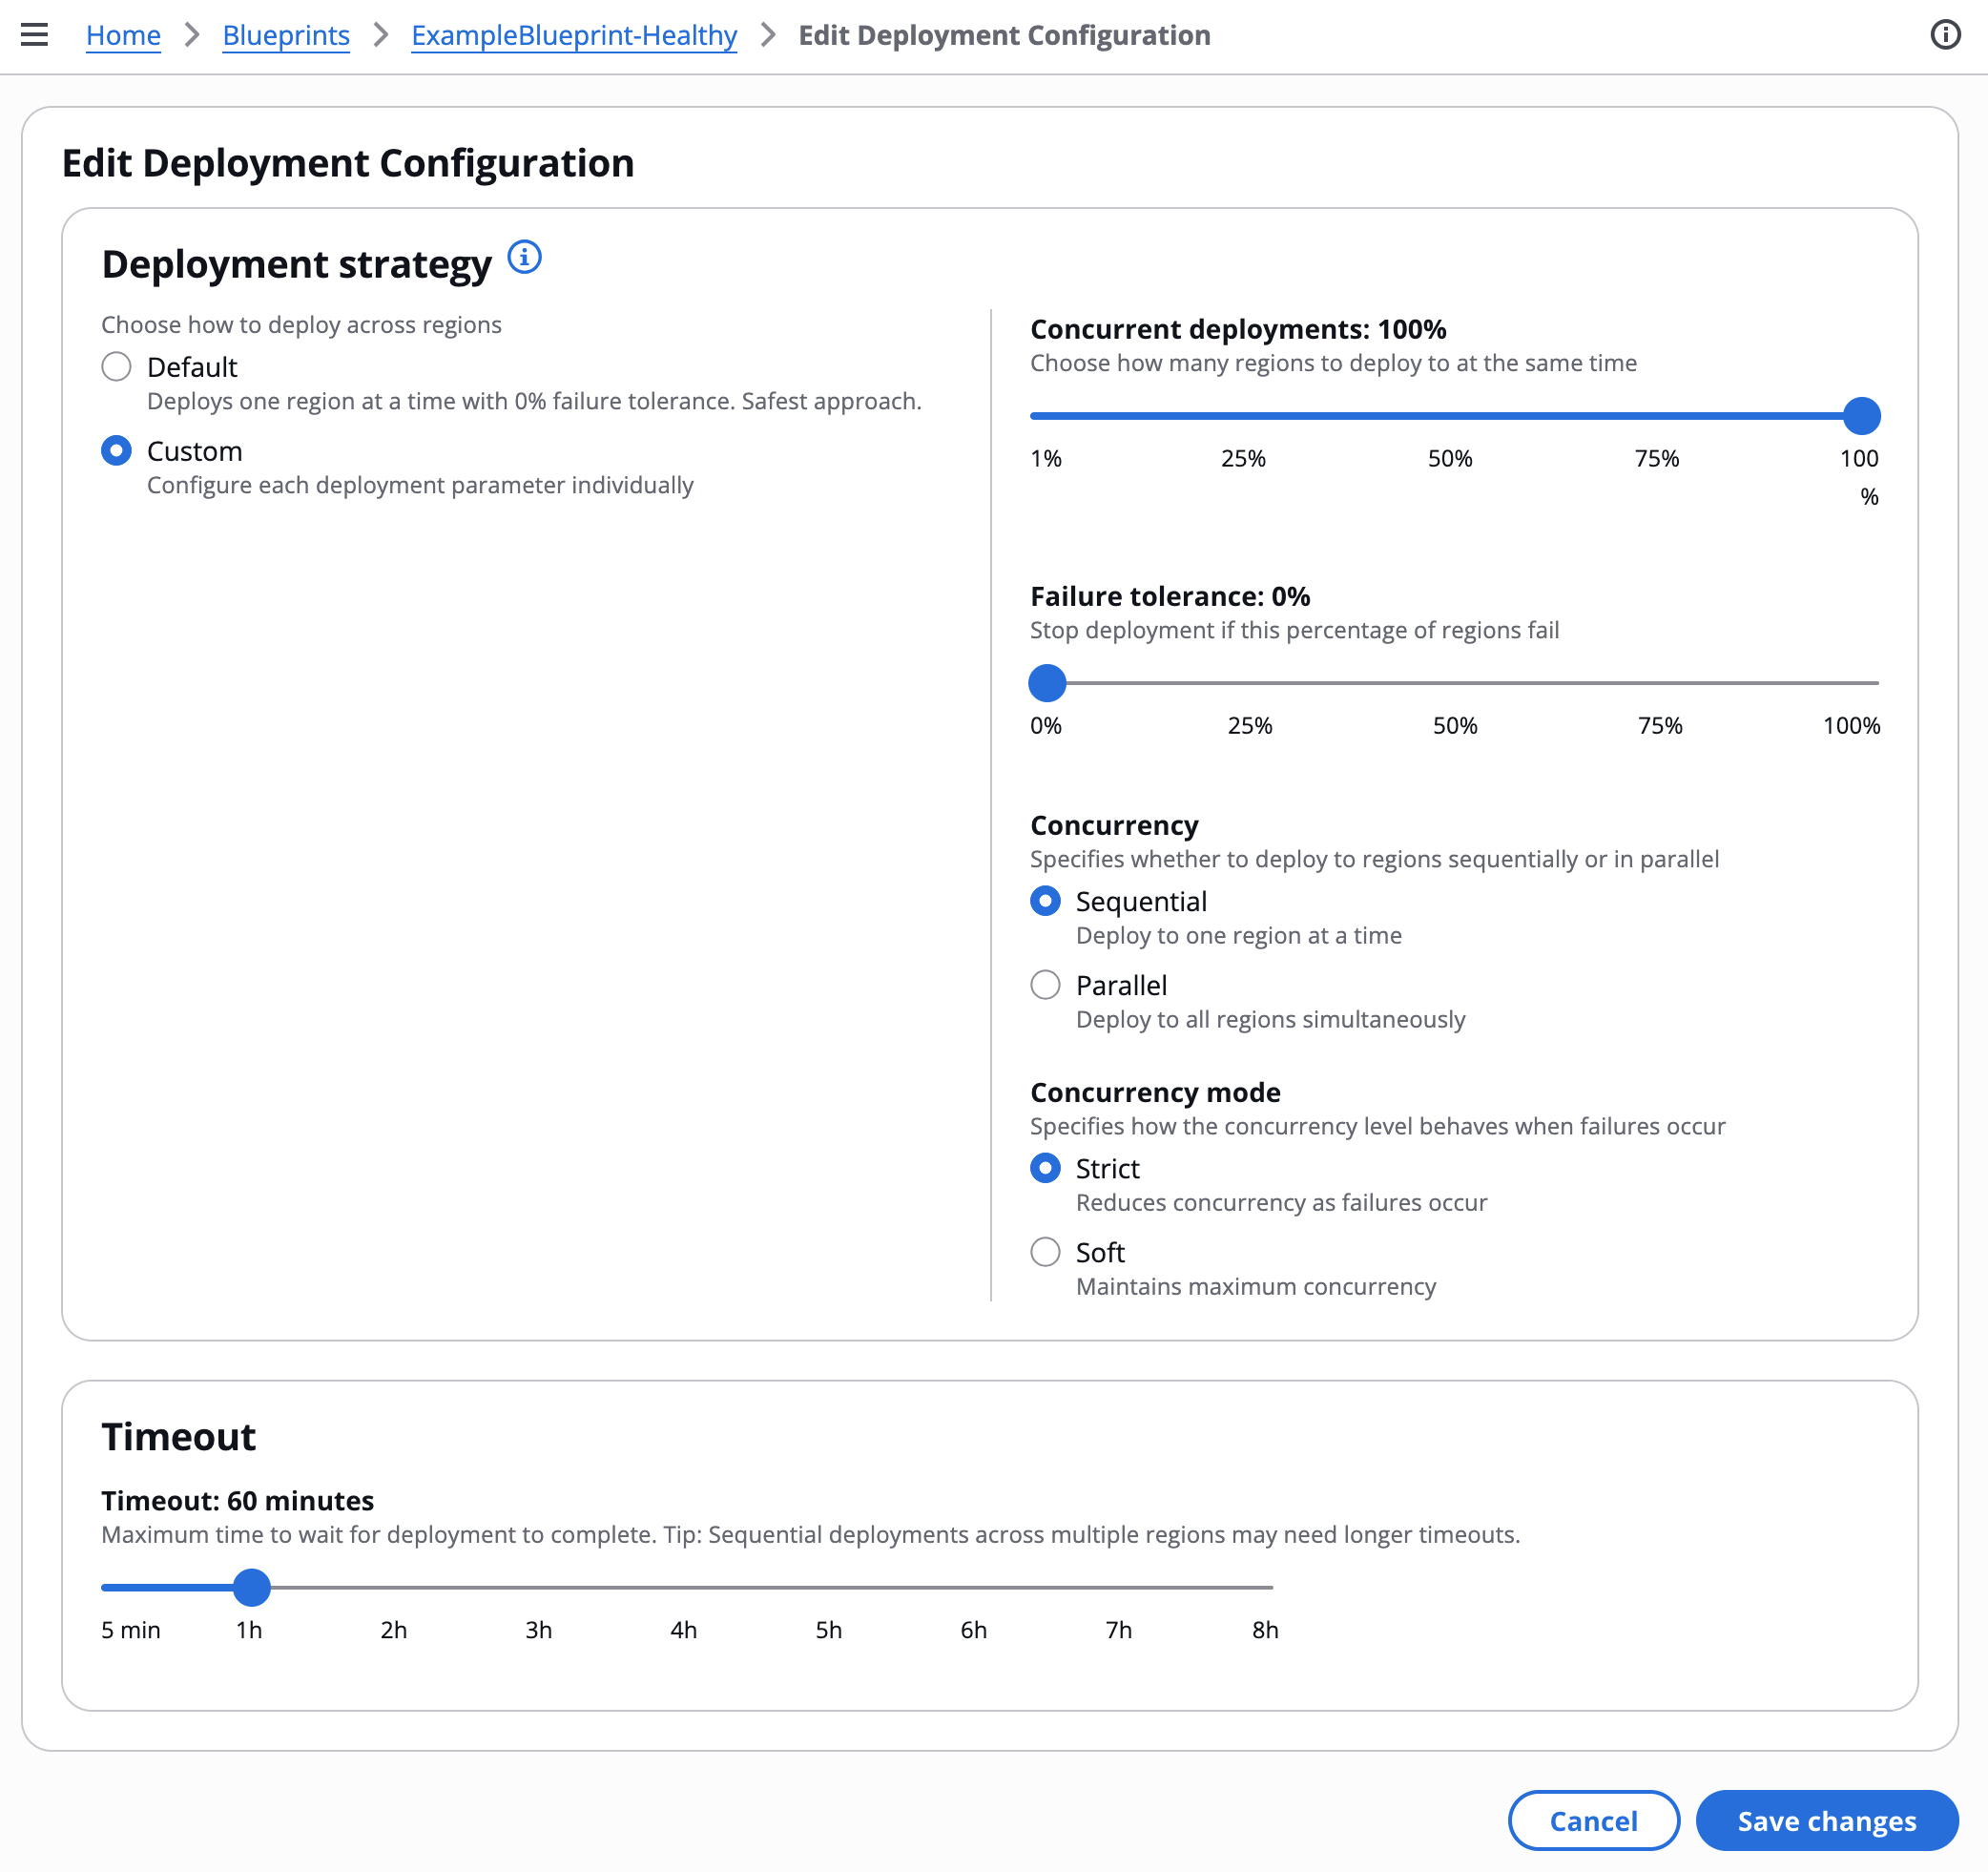
On the Deployment Configuration page, configure deployment settings:
-
For Regions, select the AWS Regions where the blueprint will be deployed. You can select multiple regions.
Note
The available regions are determined by the ISB Managed Regions parameter configured during AccountPool stack deployment. To add or remove regions, update the AccountPool stack parameter. For more information, refer to Deploy the AccountPool stack.
-
For Deployment Timeout, enter the maximum time (in minutes) to wait for deployment completion (default: 30 minutes).
-
For Deployment Strategy, choose a strategy:
Strategy Configuration Default
Deploys one region at a time with 0% failure tolerance. Safest approach.
Custom
Configure each deployment parameter individually. Use when you need specific control over deployment behavior.
-
If you selected Custom, configure these parameters:
-
Region concurrency type: Sequential (one region at a time) or Parallel (all regions simultaneously)
-
Max concurrent percentage: Percentage of regions to deploy concurrently
-
Failure tolerance percentage: Percentage of regions that can fail before the overall deployment is marked as failed. Set to 0% to stop on the first failure.
-
Concurrency mode: Strict (reduces concurrency on failures) or Soft (maintains maximum concurrency)
What success and failure mean in Innovation Sandbox
When a lease is approved and the template has a blueprint, Innovation Sandbox deploys the blueprint’s StackSet instances to the sandbox account. The deployment outcome determines what happens next:
-
Deployment succeeds: The user is granted access to the sandbox account with the pre-deployed resources. The lease becomes Active.
-
Deployment fails: The lease is terminated, the account is cleaned up and returned to the available pool, and the user does not receive access. If the lease required manual approval, it is reset to PendingApproval so the manager can investigate and re-approve. Administrators and managers are notified by email.
The failure tolerance percentage controls when CloudFormation considers the overall deployment as failed. If the number of region failures stays within the tolerance, CloudFormation marks the deployment as succeeded, even though some regions have no resources. The user receives the account, but resources may be missing in those failed regions. You can review per-region results in the deployment history on the blueprint details page.
Example: Blueprint deploys to 3 regions (us-east-1, us-west-2, eu-west-1) with 100% concurrency and 30% failure tolerance
-
1 of 3 regions fails (33% failure rate, within 30% tolerance rounded up): CloudFormation marks the deployment as succeeded. The user receives the sandbox account and the lease becomes Active. However, the failed region has no blueprint resources. The deployment history on the blueprint details page shows the per-region results.
-
2 of 3 regions fail (66% failure rate, exceeds 30% tolerance): CloudFormation marks the deployment as failed. The lease is terminated, the account is cleaned up, and the user does not receive access. Administrators and managers are notified by email to investigate the blueprint configuration.
Tip
For new blueprints, use the Default strategy (0% failure tolerance) until you have validated that the StackSet deploys reliably. Switch to Custom with higher failure tolerance only when you understand the trade-off: users may receive accounts with missing resources in failed regions.
-
-
-
Choose Next.

-
On the Review and Submit page, review your configuration and choose Register blueprint.
-
-
After registration completes, a success message confirms the blueprint is available. Managers can now associate it with lease templates.
To verify successful registration:
-
On the Blueprints page, confirm the new blueprint appears in the list.
-
Select the blueprint name to view details.
-
Verify all configuration matches your input:
-
Blueprint name is correct
-
StackSet ID matches the selected StackSet
-
Deployment configuration shows your settings
-
Tags are present (if configured)
-
-
Check the health metrics section shows "0 / 0" deployments (no deployments yet).
-
Verify the StackSet details section shows correct IAM roles and regions.
Note
Newly registered blueprints have no deployment history until associated with a lease template and used in a lease. For troubleshooting deployment issues, refer to Blueprint deployment issues in the Troubleshooting chapter.
Monitoring blueprint health
To view blueprint health and deployment history:
-
From the Administration dropdown, choose Blueprints.
-
Select a blueprint name to view details.

Blueprint details page
The blueprint details page shows:
-
Basic details: Name, blueprint ID, created by, created date, last updated date
-
Tags: Key-value pairs (if configured)
-
Deployment configuration: Timeout, region concurrency, concurrent deployments, failure tolerance, concurrency mode
-
Health metrics: Total deployments, successful deployments (shown as "X / Y"), last deployment time
-
Recent deployments: Table of recent deployments showing Lease ID, Account ID, Status (RUNNING, SUCCEEDED, FAILED, or QUEUED), Started time, and Duration. Select a deployment row to expand the Deployment details panel showing full details including Operation ID, error type, and error details for failed deployments.
-
StackSet details: StackSet name, StackSet ID, IAM roles, regions, per-StackSet health metrics
Use this information to assess blueprint reliability and troubleshoot deployment issues.
Updating blueprint metadata
To update a blueprint:
-
On the Blueprints page, select the blueprint name to view details.
-
Choose Edit from the section you want to modify:
-
Basic details: Update name or tags
-
Deployment configuration: Update timeout, deployment strategy, or concurrency settings
-
-
Make your changes and choose Save.
Note
Updating blueprint metadata does not affect existing leases. New leases will use the updated configuration.
Unregistering a blueprint
To unregister a blueprint:
-
On the Blueprints page, select one or more blueprints you want to unregister.
-
Under Actions, choose Unregister.

-
Review the blueprints to be unregistered and choose Submit.
Important
You cannot unregister blueprints that are associated with active lease templates. Edit the blueprint on all templates and turn off Enable Blueprint Selection before unregistering. Unregistering a blueprint removes it from Innovation Sandbox but does not delete the underlying StackSet.
Viewing or modifying Innovation Sandbox settings
You can view your Innovation Sandbox settings in the Settings section of the Administrator dropdown.
To view the current settings, access the AWS AppConfig console in the Hub account, or use the Settings section in the web UI.

Innovation Sandbox AppConfig application overview
You cannot modify any settings directly using the web UI. To modify these settings, this solution uses AWS AppConfig accessible from within the Hub account.
You can manage these three configuration profiles from the AWS AppConfig console in the Hub account:
-
Nuke configuration: This configuration determines how AWS Nuke behaves when cleaning your accounts. For more information on AWS Nuke, refer to the AWS Nuke documentation
. -
Global configuration: This is where you set general settings for your Innovation Sandbox solution. This includes setting the maximum budget and maximum duration for a lease, writing the terms of service and other settings. For more information on these settings, see Global configuration settings.
-
Reporting Configuration: This configuration defines the allows you to enable cost report groups that can be assigned to lease templates for cost attribution and reporting purposes.

Configuration profile overview
Modify configuration
To modify any configuration:
-
Choose the configuration you want to modify, and under the Hosted configuration versions section, choose Create. This will open a page where you can modify the configuration file.
-
To update your setting, make your changes and choose Create hosted configuration version.
-
To deploy your changes to Innovation Sandbox, choose Start deployment. The Deployment details page displays.
-
Under the Deployment details section, keep the Environment and Deployment strategy parameters set to their default values.
-
Select the version you want to deploy and choose Start deployment.
This will create and deploy a new version of your configuration. Note that all hosted configurations are versioned. You can roll back to a previous version by starting a new deployment and selecting a previous version.
Note
After the deployment is successful, you may notice a brief delay as the new settings are deployed to the Innovation Sandbox environment.
Global configuration settings
The following table includes all of the global configuration settings you can set or modify in Innovation Sandbox.
| Setting | Type | Description |
|---|---|---|
|
termsOfService |
String |
Terms of service that are presented to the user. You can customize this with your own words on how users should responsibly use their sandbox account and what they are responsible for. |
|
maintenanceMode |
Boolean |
If set to true, restricts access of all personas except Admins. This allows Admins to perform sensitive maintenance work like setup, troubleshooting, upgrading, or teardown. |
|
leases.maxBudget |
Number |
The maximum budget that a lease template can be created with. Use this setting to globally enforce that a lease never has a budget over x amount. |
|
leases.requiremaxBudget |
Boolean |
Flag that determines whether or not LeaseTemplates must be created with a maximum budget. |
|
leases.maxDurationHours |
Number |
The maximum duration that a lease template can be created with. This is a way to globally enforce that a lease never has a duration over x amount. This is measured in hours. |
|
leases.maxDurationThresholds |
Number |
The maximum duration thresholds (in hours). |
|
leases.requiremaxDuration |
Boolean |
Flag that determines whether or not LeaseTemplates must be created with a maximum duration. |
|
leases.maxLeasesPerUser |
Number |
The maximum number of leases one user can hold concurrently. This includes leases pending approval. |
|
cleanup.numberOfFailedAttemptsToCancelCleanup |
Number |
The number of times AWS Nuke will fail before the clean-up process is deemed to have failed. |
|
cleanup.waitBeforeRetryFailedAttemptSeconds |
Number |
The number of seconds to wait between retrying clean-up after a failed attempt |
|
cleanup.numberOfSuccessfulAttemptsToFinishCleanup |
Number |
The number of times AWS Nuke will need to succeed before the clean-up is deemed to be a success. |
|
cleanup.waitBeforeRerunSuccessfulAttemptSeconds |
Number |
The number of seconds to wait between retrying clean-up after a successful attempt. |
|
notification.emailFrom |
String |
Email that Amazon SES uses to send email notifications from. |
Cost report configuration settings
The following table includes the cost report configuration settings you can set or modify in Innovation Sandbox for cost attribution and reporting.
| Setting | Type | Description |
|---|---|---|
|
costReportGroups |
Array |
List of valid cost report group identifiers that can be assigned to lease templates. Maximum of 100 cost report groups, with each group name limited to 50 characters. |
|
requireCostReportGroup |
Boolean |
Flag that determines whether cost report groups are required with leases and lease templates. When enabled, all new lease template creation and updates will require a valid cost report group to be assigned. This will not be enforced for preexistng leases/lease templates and they will need to be manually updated. |
