Terjemahan disediakan oleh mesin penerjemah. Jika konten terjemahan yang diberikan bertentangan dengan versi bahasa Inggris aslinya, utamakan versi bahasa Inggris.

# Tutorial: Memulai Menggunakan Amazon A2I API
<a name="a2i-get-started-api"></a>

Tutorial ini menjelaskan operasi API yang dapat Anda gunakan untuk memulai menggunakan Amazon A2I. 

Untuk menggunakan Notebook Jupyter untuk menjalankan operasi ini, pilih Notebook Jupyter dari [Kasus Penggunaan dan Contoh Menggunakan Amazon A2I](a2i-task-types-general.md) dan gunakan [Menggunakan Instans SageMaker Notebook dengan Notebook Amazon A2I Jupyter](a2i-task-types-general.md#a2i-task-types-notebook-demo) untuk mempelajari cara menggunakannya dalam instance notebook AI. SageMaker 

Untuk mempelajari lebih lanjut tentang operasi API yang dapat Anda gunakan dengan Amazon A2I, lihat. [Gunakan APIs di Amazon Augmented AI](a2i-api-references.md)

## Buat Tim Kerja Pribadi
<a name="a2i-get-started-api-create-work-team"></a>

Anda dapat membuat tim kerja pribadi dan menambahkan diri Anda sebagai pekerja sehingga Anda dapat melihat pratinjau Amazon A2I. 

Jika Anda tidak terbiasa dengan Amazon Cognito, kami sarankan Anda menggunakan konsol SageMaker AI untuk membuat tenaga kerja pribadi dan menambahkan diri Anda sebagai pekerja swasta. Untuk petunjuk, lihat [Langkah 1: Buat Tim Kerja](a2i-get-started-console.md#a2i-get-started-console-step-1).

Jika Anda terbiasa dengan Amazon Cognito, Anda dapat menggunakan instruksi berikut untuk membuat tim kerja pribadi menggunakan API. SageMaker Setelah Anda membuat tim kerja, perhatikan tim kerja ARN ()`WorkteamArn`.

Untuk mempelajari lebih lanjut tentang tenaga kerja pribadi dan konfigurasi lain yang tersedia, lihat. [Tenaga kerja swasta](sms-workforce-private.md)

**Buat tenaga kerja pribadi**  
Jika Anda belum membuat tenaga kerja pribadi, Anda dapat melakukannya menggunakan kumpulan pengguna [Amazon Cognito](https://docs.aws.amazon.com/cognito/latest/developerguide/cognito-user-identity-pools.html). Pastikan Anda telah menambahkan diri Anda ke kumpulan pengguna ini. Anda dapat membuat tim kerja pribadi menggunakan AWS SDK untuk Python (Boto3) `[create\_workforce](https://boto3.amazonaws.com/v1/documentation/api/latest/reference/services/sagemaker.html#SageMaker.Client.create_workforce)` fungsi tersebut. Untuk bahasa khusus lainnya SDKs, lihat daftar di. [CreateWorkforce](https://docs.aws.amazon.com/sagemaker/latest/APIReference/API_CreateWorkforce.html#API_CreateWorkforce_SeeAlso)

```
    
    response = client.create_workforce(
        CognitoConfig={
            "UserPool": "{{Pool_ID}}",
            "ClientId": "{{app-client-id}}"
        },
        WorkforceName="{{workforce-name}}"
    )
```

**Buat tim kerja pribadi**  
Setelah Anda membuat tenaga kerja pribadi di AWS Wilayah untuk mengonfigurasi dan memulai lingkaran manusia Anda, Anda dapat membuat tim kerja pribadi menggunakan AWS SDK untuk Python (Boto3) `[create\_workteam](https://boto3.amazonaws.com/v1/documentation/api/latest/reference/services/sagemaker.html#SageMaker.Client.create_workteam)` fungsi tersebut. Untuk bahasa khusus lainnya SDKs, lihat daftar di. `[CreateWorkteam](https://docs.aws.amazon.com/sagemaker/latest/APIReference/API_CreateWorkteam.html#API_CreateWorkteam_SeeAlso)`

```
    response = client.create_workteam(
        WorkteamName="{{work-team-name}}",
        WorkforceName= "{{workforce-name}}",
        MemberDefinitions=[
            {
                "CognitoMemberDefinition": {
                    "UserPool": "{{<aws-region>_ID}}",
                    "UserGroup": "{{user-group}}",
                    "ClientId": "{{app-client-id}}"
                },
            }
        ]
    )
```

Akses ARN tim kerja Anda sebagai berikut:

```
    workteamArn = response["WorkteamArn"]
```

**Daftar tim kerja pribadi di akun Anda**  
Jika Anda telah membuat tim kerja pribadi, Anda dapat mencantumkan semua tim kerja di AWS Wilayah tertentu di akun Anda menggunakan AWS SDK untuk Python (Boto3) `[list\_workteams](https://boto3.amazonaws.com/v1/documentation/api/latest/reference/services/sagemaker.html#SageMaker.Client.list_workteams)` fungsi tersebut. Untuk bahasa khusus lainnya SDKs, lihat daftar di. `[ListWorkteams](https://docs.aws.amazon.com/sagemaker/latest/APIReference/API_ListWorkteams.html#API_ListWorkteams_SeeAlso)` 

```
    response = client.list_workteams()
```

Jika Anda memiliki banyak tim kerja di akun Anda, Anda mungkin ingin menggunakan`MaxResults`,`SortBy`, dan `NameContains` memfilter hasil Anda.

## Buat Alur Kerja Tinjauan Manusia
<a name="a2i-get-started-api-create-human-review-workflow"></a>

Anda dapat membuat alur kerja tinjauan manusia menggunakan operasi Amazon `[CreateFlowDefinition](https://docs.aws.amazon.com/sagemaker/latest/APIReference/API_CreateFlowDefinition.html)` A2I. Sebelum membuat alur kerja tinjauan manusia, Anda perlu membuat UI tugas manusia. Anda dapat melakukan ini dengan `[CreateHumanTaskUi](https://docs.aws.amazon.com/sagemaker/latest/APIReference/API_CreateHumanTaskUi.html)` operasi.

Jika Anda menggunakan Amazon A2I dengan integrasi Amazon Textract atau Amazon Rekognition, Anda dapat menentukan kondisi aktivasi menggunakan JSON. 

### Buat UI Tugas Manusia
<a name="a2i-get-started-api-worker-task-template"></a>

Jika Anda membuat alur kerja tinjauan manusia untuk digunakan dengan integrasi Amazon Ttract atau Amazon Rekognition, Anda perlu menggunakan dan memodifikasi templat tugas pekerja yang sudah dibuat sebelumnya. Untuk semua integrasi kustom, Anda dapat menggunakan template tugas pekerja kustom Anda sendiri. Gunakan tabel berikut untuk mempelajari cara membuat UI tugas manusia menggunakan templat tugas pekerja untuk dua integrasi bawaan. Ganti template dengan milik Anda sendiri untuk menyesuaikan permintaan ini. 

------
#### [ Amazon Textract – Key-value pair extraction ]

Untuk mempelajari lebih lanjut tentang template ini, lihat[Contoh Template Kustom untuk Amazon Texttract](a2i-custom-templates.md#a2i-custom-templates-textract-sample).

```
{{template}} = r"""
<script src="https://assets.crowd.aws/crowd-html-elements.js"></script>
{% capture s3_uri %}http://s3.amazonaws.com/{{ task.input.aiServiceRequest.document.s3Object.bucket }}/{{ task.input.aiServiceRequest.document.s3Object.name }}{% endcapture %}
<crowd-form>
  <crowd-textract-analyze-document 
      src="{{ s3_uri | grant_read_access }}" 
      initial-value="{{ task.input.selectedAiServiceResponse.blocks }}" 
      header="Review the key-value pairs listed on the right and correct them if they don"t match the following document." 
      no-key-edit="" 
      no-geometry-edit="" 
      keys="{{ task.input.humanLoopContext.importantFormKeys }}" 
      block-types='["KEY_VALUE_SET"]'>
    <short-instructions header="Instructions">
        <p>Click on a key-value block to highlight the corresponding key-value pair in the document.
        </p><p><br></p>
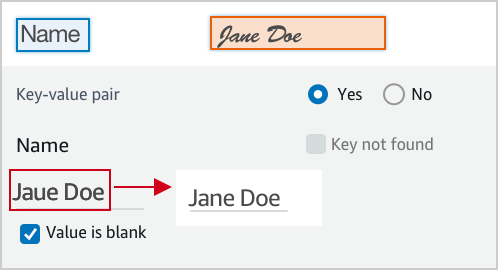
        <p>If it is a valid key-value pair, review the content for the value. If the content is incorrect, correct it.
        </p><p><br></p>
        <p>The text of the value is incorrect, correct it.</p>
        <p><img src="https://assets.crowd.aws/images/a2i-console/correct-value-text.png">
        </p><p><br></p>
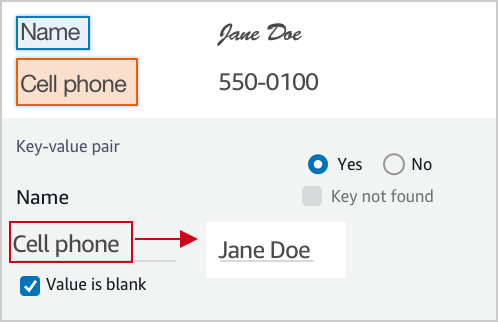
        <p>A wrong value is identified, correct it.</p>
        <p><img src="https://assets.crowd.aws/images/a2i-console/correct-value.png">
        </p><p><br></p>
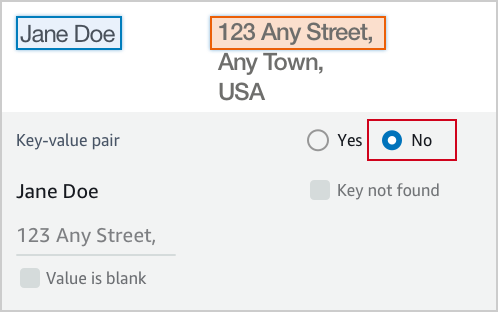
        <p>If it is not a valid key-value relationship, choose No.</p>
        <p><img src="https://assets.crowd.aws/images/a2i-console/not-a-key-value-pair.png">
        </p><p><br></p>
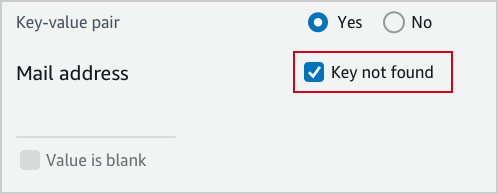
        <p>If you can’t find the key in the document, choose Key not found.</p>
        <p><img src="https://assets.crowd.aws/images/a2i-console/key-is-not-found.png">
        </p><p><br></p>
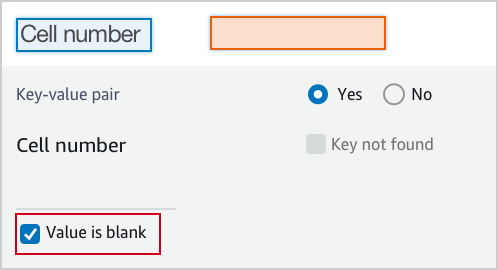
        <p>If the content of a field is empty, choose Value is blank.</p>
        <p><img src="https://assets.crowd.aws/images/a2i-console/value-is-blank.png">
        </p><p><br></p>
        <p><strong>Examples</strong></p>
        <p>Key and value are often displayed next or below to each other.
        </p><p><br></p>
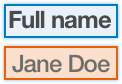
        <p>Key and value displayed in one line.</p>
        <p><img src="https://assets.crowd.aws/images/a2i-console/sample-key-value-pair-1.png">
        </p><p><br></p>
        <p>Key and value displayed in two lines.</p>
        <p><img src="https://assets.crowd.aws/images/a2i-console/sample-key-value-pair-2.png">
        </p><p><br></p>
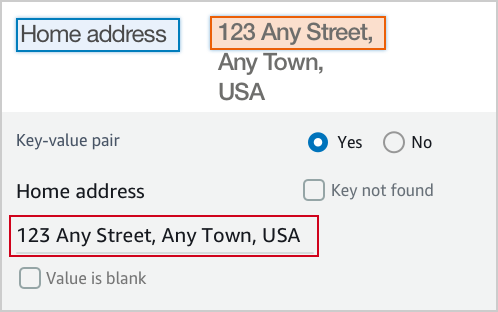
        <p>If the content of the value has multiple lines, enter all the text without line break. 
        Include all value text even if it extends beyond the highlight box.</p>
        <p><img src="https://assets.crowd.aws/images/a2i-console/multiple-lines.png"></p>
    </short-instructions>
    <full-instructions header="Instructions"></full-instructions>
  </crowd-textract-analyze-document>
</crowd-form>
"""
```

------
#### [ Amazon Rekognition – Image moderation ]

Untuk mempelajari lebih lanjut tentang template ini, lihat[Contoh Template Kustom untuk Amazon Rekognition](a2i-custom-templates.md#a2i-custom-templates-rekognition-sample).

```
{{template}} = r"""
<script src="https://assets.crowd.aws/crowd-html-elements.js"></script>
{% capture s3_uri %}http://s3.amazonaws.com/{{ task.input.aiServiceRequest.image.s3Object.bucket }}/{{ task.input.aiServiceRequest.image.s3Object.name }}{% endcapture %}

<crowd-form>
  <crowd-rekognition-detect-moderation-labels
    categories='[
      {% for label in task.input.selectedAiServiceResponse.moderationLabels %}
        {
          name: "{{ label.name }}",
          parentName: "{{ label.parentName }}",
        },
      {% endfor %}
    ]'
    src="{{ s3_uri | grant_read_access }}"
    header="Review the image and choose all applicable categories."
  >
    <short-instructions header="Instructions">
      <style>
        .instructions {
          white-space: pre-wrap;
        }
      </style>
      <p class="instructions">Review the image and choose all applicable categories.
If no categories apply, choose None.

<b>Nudity</b>
Visuals depicting nude male or female person or persons

<b>Partial Nudity</b>
Visuals depicting covered up nudity, for example using hands or pose

<b>Revealing Clothes</b>
Visuals depicting revealing clothes and poses

<b>Physical Violence</b>
Visuals depicting violent physical assault, such as kicking or punching

<b>Weapon Violence</b>
Visuals depicting violence using weapons like firearms or blades, such as shooting

<b>Weapons</b>
Visuals depicting weapons like firearms and blades
    </short-instructions>

    <full-instructions header="Instructions"></full-instructions>
  </crowd-rekognition-detect-moderation-labels>
</crowd-form>"""
```

------
#### [ Custom Integration ]

Berikut ini adalah contoh template yang dapat digunakan dalam integrasi kustom. Template ini digunakan dalam [notebook](https://github.com/aws-samples/amazon-a2i-sample-jupyter-notebooks/blob/master/Amazon%20Augmented%20AI%20(A2I)%20and%20Comprehend%20DetectSentiment.ipynb) ini, menunjukkan integrasi kustom dengan Amazon Comprehend.

```
{{template}} = r"""
<script src="https://assets.crowd.aws/crowd-html-elements.js"></script>

<crowd-form>
    <crowd-classifier
      name="sentiment"
      categories='["Positive", "Negative", "Neutral", "Mixed"]'
      initial-value="{{ task.input.initialValue }}"
      header="What sentiment does this text convey?"
    >
      <classification-target>
        {{ task.input.taskObject }}
      </classification-target>
      
      <full-instructions header="Sentiment Analysis Instructions">
        <p><strong>Positive</strong> sentiment include: joy, excitement, delight</p>
        <p><strong>Negative</strong> sentiment include: anger, sarcasm, anxiety</p>
        <p><strong>Neutral</strong>: neither positive or negative, such as stating a fact</p>
        <p><strong>Mixed</strong>: when the sentiment is mixed</p>
      </full-instructions>

      <short-instructions>
       Choose the primary sentiment that is expressed by the text. 
      </short-instructions>
    </crowd-classifier>
</crowd-form>
"""
```

------

Menggunakan template yang ditentukan di atas, Anda dapat membuat template menggunakan AWS SDK untuk Python (Boto3) `[create\_human\_task\_ui](https://boto3.amazonaws.com/v1/documentation/api/latest/reference/services/sagemaker.html#SageMaker.Client.create_human_task_ui)` fungsi. Untuk bahasa khusus lainnya SDKs, lihat daftar di. `[CreateHumanTaskUi](https://docs.aws.amazon.com/sagemaker/latest/APIReference/API_CreateHumanTaskUi.html#API_CreateHumanTaskUi_SeeAlso)` 

```
    
    response = client.create_human_task_ui(
        HumanTaskUiName="{{human-task-ui-name}}",
        UiTemplate={
            "Content": {{template}}
        }
    )
```

Elemen respon ini berisi tugas manusia UI ARN. Simpan ini sebagai berikut:

```
    humanTaskUiArn = response["HumanTaskUiArn"]
```

### Buat JSON untuk menentukan kondisi aktivasi
<a name="a2i-get-started-api-activation-conditions"></a>

Untuk integrasi bawaan Amazon Textract dan Amazon Rekognition, Anda dapat menyimpan kondisi aktivasi di objek JSON dan menggunakannya dalam permintaan Anda. `CreateFlowDefinition` 

Selanjutnya, pilih tab untuk melihat contoh kondisi aktivasi yang dapat Anda gunakan untuk integrasi bawaan ini. Untuk informasi tambahan tentang opsi kondisi aktivasi, lihat[Skema JSON untuk Kondisi Aktivasi Loop Manusia di Amazon Augmented AI](a2i-human-fallback-conditions-json-schema.md).

------
#### [ Amazon Textract – Key-value pair extraction ]

Contoh ini menentukan kondisi untuk kunci tertentu (seperti`Mail address`) dalam dokumen. Jika kepercayaan Amazon Textract berada di luar ambang batas yang ditetapkan di sini, dokumen dikirim ke manusia untuk ditinjau, dengan kunci spesifik yang memulai loop manusia diminta ke pekerja.

```
      import json  

      humanLoopActivationConditions = json.dumps(
        {
            "Conditions": [
                {
                  "Or": [
                    
                    {
                        "ConditionType": "ImportantFormKeyConfidenceCheck",
                        "ConditionParameters": {
                            "ImportantFormKey": "Mail address",
                            "ImportantFormKeyAliases": ["Mail Address:","Mail address:", "Mailing Add:","Mailing Addresses"],
                            "KeyValueBlockConfidenceLessThan": 100,
                            "WordBlockConfidenceLessThan": 100
                        }
                    },
                    {
                        "ConditionType": "MissingImportantFormKey",
                        "ConditionParameters": {
                            "ImportantFormKey": "Mail address",
                            "ImportantFormKeyAliases": ["Mail Address:","Mail address:","Mailing Add:","Mailing Addresses"]
                        }
                    },
                    {
                        "ConditionType": "ImportantFormKeyConfidenceCheck",
                        "ConditionParameters": {
                            "ImportantFormKey": "Phone Number",
                            "ImportantFormKeyAliases": ["Phone number:", "Phone No.:", "Number:"],
                            "KeyValueBlockConfidenceLessThan": 100,
                            "WordBlockConfidenceLessThan": 100
                        }
                    },
                    {
                      "ConditionType": "ImportantFormKeyConfidenceCheck",
                      "ConditionParameters": {
                        "ImportantFormKey": "*",
                        "KeyValueBlockConfidenceLessThan": 100,
                        "WordBlockConfidenceLessThan": 100
                      }
                    },
                    {
                      "ConditionType": "ImportantFormKeyConfidenceCheck",
                      "ConditionParameters": {
                        "ImportantFormKey": "*",
                        "KeyValueBlockConfidenceGreaterThan": 0,
                        "WordBlockConfidenceGreaterThan": 0
                      }
                    }
            ]
        }
            ]
        }
    )
```

------
#### [ Amazon Rekognition – Image moderation ]

Kondisi aktivasi loop manusia yang digunakan di sini disesuaikan dengan moderasi konten Rekognition Amazon; mereka didasarkan pada ambang `Suggestive` kepercayaan untuk label dan moderasi. `Female Swimwear Or Underwear`

```
        import json  

        humanLoopActivationConditions = json.dumps(
        {
            "Conditions": [
                {
                  "Or": [
                    {
                        "ConditionType": "ModerationLabelConfidenceCheck",
                        "ConditionParameters": {
                            "ModerationLabelName": "Suggestive",
                            "ConfidenceLessThan": 98
                        }
                    },
                    {
                        "ConditionType": "ModerationLabelConfidenceCheck",
                        "ConditionParameters": {
                            "ModerationLabelName": "Female Swimwear Or Underwear",
                            "ConfidenceGreaterThan": 98
                        }
                    }
                  ]
               }
            ]
        }
    )
```

------

### Buat alur kerja tinjauan manusia
<a name="a2i-get-started-api-flow-definition"></a>

Bagian ini memberikan contoh `CreateFlowDefinition` AWS SDK untuk Python (Boto3) permintaan menggunakan sumber daya yang dibuat di bagian sebelumnya. Untuk bahasa khusus lainnya SDKs, lihat daftar di. [CreateFlowDefinition](https://docs.aws.amazon.com/sagemaker/latest/APIReference/API_CreateFlowDefinition.html#API_CreateFlowDefinition_SeeAlso) Gunakan tab di tabel berikut untuk melihat permintaan untuk membuat alur kerja tinjauan manusia untuk integrasi bawaan Amazon Textract dan Amazon Rekognition.

------
#### [ Amazon Textract – Key-value pair extraction ]

Jika Anda menggunakan integrasi bawaan dengan Amazon Textract, Anda harus menentukan `"AWS/Textract/AnalyzeDocument/Forms/V1"` untuk `"AwsManagedHumanLoopRequestSource"` in. `HumanLoopRequestSource` 

```
    response = client.create_flow_definition(
        FlowDefinitionName="{{human-review-workflow-name}}",
        HumanLoopRequestSource={
            "AwsManagedHumanLoopRequestSource": "AWS/Textract/AnalyzeDocument/Forms/V1"
        }, 
        HumanLoopActivationConfig={
            "HumanLoopActivationConditionsConfig": {
                "HumanLoopActivationConditions": {{humanLoopActivationConditions}}
            }
        },
        HumanLoopConfig={
            "WorkteamArn": {{workteamArn}},
            "HumanTaskUiArn": {{humanTaskUiArn}},
            "TaskTitle": "{{Document entry review}}",
            "TaskDescription": "{{Review the document and instructions. Complete the task}}",
            "TaskCount": {{1}},
            "TaskAvailabilityLifetimeInSeconds": {{43200}},
            "TaskTimeLimitInSeconds": {{3600}},
            "TaskKeywords": [
                "{{document review}}",
            ],
        },
        OutputConfig={
            "S3OutputPath": "{{s3://amzn-s3-demo-bucket/prefix/}}",
        },
        RoleArn="{{arn:aws:iam::<account-number>:role/<role-name>}}",
        Tags=[
            {
                "Key": "{{string}}",
                "Value": "{{string}}"
            },
        ]
    )
```

------
#### [ Amazon Rekognition – Image moderation ]

Jika Anda menggunakan integrasi bawaan dengan Amazon Rekognition, Anda harus `"AWS/Rekognition/DetectModerationLabels/Image/V3"` menentukan untuk di. `"AwsManagedHumanLoopRequestSource"` `HumanLoopRequestSource`

```
    response = client.create_flow_definition(
        FlowDefinitionName="{{human-review-workflow-name}}",
        HumanLoopRequestSource={
            "AwsManagedHumanLoopRequestSource": "AWS/Rekognition/DetectModerationLabels/Image/V3"
        }, 
        HumanLoopActivationConfig={
            "HumanLoopActivationConditionsConfig": {
                "HumanLoopActivationConditions": {{humanLoopActivationConditions}}
            }
        },
        HumanLoopConfig={
            "WorkteamArn": {{workteamArn}},
            "HumanTaskUiArn": {{humanTaskUiArn}},
            "TaskTitle": "{{Image content moderation}}",
            "TaskDescription": "{{Review the image and instructions. Complete the task}}",
            "TaskCount": {{1}},
            "TaskAvailabilityLifetimeInSeconds": {{43200}},
            "TaskTimeLimitInSeconds": {{3600}},
            "TaskKeywords": [
                "{{content moderation}}",
            ],
        },
        OutputConfig={
            "S3OutputPath": "{{s3://amzn-s3-demo-bucket/prefix/}}",
        },
        RoleArn="{{arn:aws:iam::<account-number>:role/<role-name>}}",
        Tags=[
            {
                "Key": "{{string}}",
                "Value": "{{string}}"
            },
        ]
    )
```

------
#### [ Custom Integration ]

Jika Anda menggunakan integrasi kustom, kecualikan parameter berikut:`HumanLoopRequestSource`,`HumanLoopActivationConfig`.

```
    response = client.create_flow_definition(
        FlowDefinitionName="{{human-review-workflow-name}}",
        HumanLoopConfig={
            "WorkteamArn": {{workteamArn}},
            "HumanTaskUiArn": {{humanTaskUiArn}},
            "TaskTitle": "{{Image content moderation}}",
            "TaskDescription": "{{Review the image and instructions. Complete the task}}",
            "TaskCount": {{1}},
            "TaskAvailabilityLifetimeInSeconds": {{43200}},
            "TaskTimeLimitInSeconds": {{3600}},
            "TaskKeywords": [
                "{{content moderation}}",
            ],
        },
        OutputConfig={
            "S3OutputPath": "{{s3://amzn-s3-demo-bucket/prefix/}}",
        },
        RoleArn="{{arn:aws:iam::<account-number>:role/<role-name>}}",
        Tags=[
            {
                "Key": "{{string}}",
                "Value": "{{string}}"
            },
        ]
    )
```

------

Setelah membuat alur kerja tinjauan manusia, Anda dapat mengambil ARN definisi aliran dari respons:

```
    {{humanReviewWorkflowArn}} = response["FlowDefinitionArn"]    
```

## Buat Loop Manusia
<a name="a2i-get-started-api-create-human-loop"></a>

Operasi API yang Anda gunakan untuk memulai loop manusia bergantung pada integrasi Amazon A2I yang Anda gunakan. 
+ Jika Anda menggunakan integrasi bawaan Amazon Textract, Anda menggunakan operasi ini [AnalyzeDocument](https://docs.aws.amazon.com/textract/latest/dg/API_AnalyzeDocument.html).
+ Jika Anda menggunakan integrasi bawaan Amazon Rekognition, Anda menggunakan operasi ini. [DetectModerationLabels](https://docs.aws.amazon.com/rekognition/latest/dg/API_DetectModerationLabels.html)
+ Jika Anda menggunakan integrasi khusus, Anda menggunakan [StartHumanLoop](https://docs.aws.amazon.com/augmented-ai/2019-11-07/APIReference/API_StartHumanLoop.html)operasi. 

Pilih jenis tugas Anda di tabel berikut untuk melihat contoh permintaan Amazon Textract dan Amazon Rekognition menggunakan file. AWS SDK untuk Python (Boto3)

------
#### [ Amazon Textract – Key-value pair extraction ]

Contoh berikut menggunakan AWS SDK untuk Python (Boto3) to call `analyze_document` in us-west-2. Ganti teks merah yang dicetak miring dengan sumber daya Anda. Sertakan [https://docs.aws.amazon.com/augmented-ai/2019-11-07/APIReference/API_HumanLoopDataAttributes.html](https://docs.aws.amazon.com/augmented-ai/2019-11-07/APIReference/API_HumanLoopDataAttributes.html)parameter jika Anda menggunakan tenaga kerja Amazon Mechanical Turk. *Untuk informasi selengkapnya, lihat dokumen [analyze\_document](https://boto3.amazonaws.com/v1/documentation/api/latest/reference/services/textract.html#Textract.Client.analyze_document) di Referensi API.AWS SDK for Python (Boto) *

```
   response = client.analyze_document(
         Document={"S3Object": {"Bucket": "{{amzn-s3-demo-bucket}}", "Name": "{{document-name.pdf}}"},
         HumanLoopConfig={
            "FlowDefinitionArn":"{{arn:aws:sagemaker:us-west-2:111122223333:flow-definition/flow-definition-name}}",
            "HumanLoopName":"{{human-loop-name}}",
            "DataAttributes" : {ContentClassifiers:[{{"FreeOfPersonallyIdentifiableInformation"}}|{{"FreeOfAdultContent"}}]}
         }
         FeatureTypes=["FORMS"]
    )
```

Loop manusia hanya dibuat jika kepercayaan Amazon Texact untuk tugas analisis dokumen memenuhi kondisi aktivasi yang Anda tentukan dalam alur kerja tinjauan manusia Anda. Anda dapat memeriksa `response` elemen untuk menentukan apakah loop manusia telah dibuat. Untuk melihat semua yang termasuk dalam tanggapan ini, lihat [https://docs.aws.amazon.com/textract/latest/dg/API_HumanLoopActivationOutput.html](https://docs.aws.amazon.com/textract/latest/dg/API_HumanLoopActivationOutput.html).

```
    if "HumanLoopArn" in analyzeDocumentResponse["HumanLoopActivationOutput"]:
        # A human loop has been started!
        print(f"A human loop has been started with ARN: {analyzeDocumentResponse["HumanLoopActivationOutput"]["HumanLoopArn"]}"
```

------
#### [ Amazon Rekognition – Image moderation ]

Contoh berikut menggunakan AWS SDK untuk Python (Boto3) to call `detect_moderation_labels` in us-west-2. Ganti teks merah yang dicetak miring dengan sumber daya Anda. Sertakan [https://docs.aws.amazon.com/augmented-ai/2019-11-07/APIReference/API_HumanLoopDataAttributes.html](https://docs.aws.amazon.com/augmented-ai/2019-11-07/APIReference/API_HumanLoopDataAttributes.html)parameter jika Anda menggunakan tenaga kerja Amazon Mechanical Turk. *Untuk informasi selengkapnya, lihat dokumen [detect\_moderation\_labels](https://boto3.amazonaws.com/v1/documentation/api/latest/reference/services/rekognition.html#Rekognition.Client.detect_moderation_labels) di Referensi API.AWS SDK for Python (Boto) *

```
   response = client.detect_moderation_labels(
            Image={"S3Object":{"Bucket": "{{amzn-s3-demo-bucket}}", "Name": "{{image-name.png}}"}},
            HumanLoopConfig={
               "FlowDefinitionArn":"{{arn:aws:sagemaker:us-west-2:111122223333:flow-definition/flow-definition-name}}",
               "HumanLoopName":"{{human-loop-name}}",
               "DataAttributes":{ContentClassifiers:[{{"FreeOfPersonallyIdentifiableInformation"}}|{{"FreeOfAdultContent"}}]}
             }
    )
```

Loop manusia hanya dibuat jika kepercayaan Amazon Rekognition untuk tugas moderasi gambar memenuhi kondisi aktivasi yang Anda tentukan dalam alur kerja tinjauan manusia Anda. Anda dapat memeriksa `response` elemen untuk menentukan apakah loop manusia telah dibuat. Untuk melihat semua yang termasuk dalam tanggapan ini, lihat [https://docs.aws.amazon.com/rekognition/latest/dg/API_HumanLoopActivationOutput.html](https://docs.aws.amazon.com/rekognition/latest/dg/API_HumanLoopActivationOutput.html).

```
    if "HumanLoopArn" in response["HumanLoopActivationOutput"]:
        # A human loop has been started!
        print(f"A human loop has been started with ARN: {response["HumanLoopActivationOutput"]["HumanLoopArn"]}")
```

------
#### [ Custom Integration ]

Contoh berikut menggunakan AWS SDK untuk Python (Boto3) to call `start_human_loop` in us-west-2. Ganti teks merah yang dicetak miring dengan sumber daya Anda. Sertakan [https://docs.aws.amazon.com/augmented-ai/2019-11-07/APIReference/API_HumanLoopDataAttributes.html](https://docs.aws.amazon.com/augmented-ai/2019-11-07/APIReference/API_HumanLoopDataAttributes.html)parameter jika Anda menggunakan tenaga kerja Amazon Mechanical Turk. *Untuk informasi selengkapnya, lihat dokumen [start\_human\_loop](https://boto3.amazonaws.com/v1/documentation/api/latest/reference/services/sagemaker-a2i-runtime.html#AugmentedAIRuntime.Client.start_human_loop) di Referensi API.AWS SDK for Python (Boto) *

```
   response = client.start_human_loop(
        HumanLoopName= "{{human-loop-name}}",
        FlowDefinitionArn= "{{arn:aws:sagemaker:us-west-2:111122223333:flow-definition/flow-definition-name}}",
        HumanLoopInput={"InputContent": {{inputContentJson}}},
        DataAttributes={"ContentClassifiers":[{{"FreeOfPersonallyIdentifiableInformation"|"FreeOfAdultContent"}}]}
   )
```

Contoh ini menyimpan konten input dalam variabel{{`inputContentJson`}}. Asumsikan bahwa konten input berisi dua elemen: uraian teks dan sentimen (seperti`Positive`,, atau`Neutral`)`Negative`, dan diformat sebagai berikut:

```
    inputContent = {
        "initialValue": sentiment,
         "taskObject": blurb
     }
```

Kunci `initialValue` dan `taskObject` harus sesuai dengan kunci yang digunakan dalam elemen cair dari template tugas pekerja. Lihat template kustom [Buat UI Tugas Manusia](#a2i-get-started-api-worker-task-template) untuk melihat contoh. 

Untuk membuat`{{inputContentJson}}`, lakukan hal berikut: 

```
    import json
    
    inputContentJson = json.dumps(inputContent)
```

Lingkaran manusia dimulai setiap kali Anda menelepon`start_human_loop`. Untuk memeriksa status loop manusia Anda, gunakan [describe\_human\_loop](https://boto3.amazonaws.com/v1/documentation/api/latest/reference/services/sagemaker-a2i-runtime.html#AugmentedAIRuntime.Client.describe_human_loop): 

```
    human_loop_info = a2i.describe_human_loop(HumanLoopName="{{human_loop_name}}")
    print(f"HumanLoop Status: {resp["HumanLoopStatus"]}")
    print(f"HumanLoop Output Destination: {resp["HumanLoopOutput"]}")
```

------