Epic EHR integration
Amazon Connect Health integrates directly with Epic EHR through the Amazon Connect Health application for Epic, which is privately listed. The integration uses OAuth2 authentication with FHIR R4 APIs and Epic private APIs to support patient verification and appointment management workflows.
Topics
Prerequisites
Before you begin, make sure that you have the following:
-
Epic instance accessible via FHIR R4 endpoint
-
Epic Administrator with access to Epic Showroom
-
AWS account team contact to initiate onboarding
-
JWK Set URL (JKU) configuration
Setup process
The Amazon Connect Health application for Epic is privately listed and not publicly available in Epic Showroom. Follow these steps to complete the integration.
Step 1: Submit an Interested Organization request
Your Epic Administrator searches for the Amazon Connect Health application using the Client ID and submits an Interested Organization request through Epic Showroom.
-
Non-production Client ID:
cd1e1810-5406-43bb-9eba-7c8c0f2eb9cb -
Production Client ID:
c86ee400-3608-449e-93ea-1046eeae00da
Step 2: AWS verification and JKU URL provisioning
AWS reviews and verifies your organization before granting access. Allow 2-3 business days for this step. Once approved, AWS generates your customer-specific JKU URL and shares it with you.
Step 3: Configure authentication in Epic
AWS sets up authentication when you request to download the Amazon Connect Health application. See Authentication configuration for more details.
Step 4: Install the application and configure backend EMP user
Your Epic Administrator installs the Amazon Connect Health application and configures the backend EMP user with appropriate security points for all required APIs. See FHIR resources and API configuration for the complete list of required APIs.
Step 5: Configure EHR credentials in the AWS Healthcare AI console
After installation, configure your EHR integration in the Amazon Connect Health console using the fields described in Configuration fields.
Authentication configuration
Amazon Connect Health uses OAuth2 authentication with JWK Set URL (JKU) for secure key management and rotation.
Configure backend EMP user
-
Follow Epic’s standard process for configuring a backend EMP user for the Amazon Connect Health application.
-
Grant the backend EMP user security points for all APIs listed in FHIR resources and API configuration.
-
Verify the user can access all required FHIR resources and Epic private APIs.
FHIR resources and API configuration
Application settings
| Setting | Value |
|---|---|
|
SMART Scope Version |
SMART v1 |
|
FHIR IDs |
Unconstrained |
Public FHIR R4 resources
Enable the following resources with appropriate security endpoints:
| Resource | Category | Version | Purpose |
|---|---|---|---|
|
Appointment.Read |
Appointments |
R4 |
Read appointment details |
|
Appointment.Search |
Appointments |
R4 |
Search for appointments |
|
Location.Read |
Location |
R4 |
Read location information |
|
Patient.$match |
Demographics |
R4 |
Match patient records |
|
Patient.Read |
Demographics |
R4 |
Read patient information |
|
PatientLookup |
Patient Lookup |
2012 |
Legacy patient lookup |
|
Practitioner.Read |
Practitioner |
R4 |
Read practitioner details |
|
PractitionerRole.Search |
Practitioner Role |
R4 |
Search practitioner roles |
Epic private API resources
Enable the following Epic private APIs with appropriate security endpoints:
| API | Version | Purpose |
|---|---|---|
|
CancelAppointment |
2019 |
Cancel patient appointments |
|
GetAccountDemographics |
2018 |
Retrieve account demographics |
|
GetFutureAppointments |
2014 |
Query upcoming appointments |
|
GetGuarantorsAndCoverage |
2014 |
Access insurance information |
|
GetOpenSlots |
2019 |
Find available appointment slots |
|
GetProviders |
2019 |
Retrieve provider information |
|
ScheduleAppointment |
2019 |
Book new appointments |
|
ScheduleAppointmentWithInsurance |
2019 |
Book appointments with insurance |
Security configuration checklist
-
All FHIR R4 resources enabled
-
All Epic private APIs enabled
-
Backend EMP user granted access to all resources
-
Security endpoints configured per Epic documentation
-
Permissions tested and verified
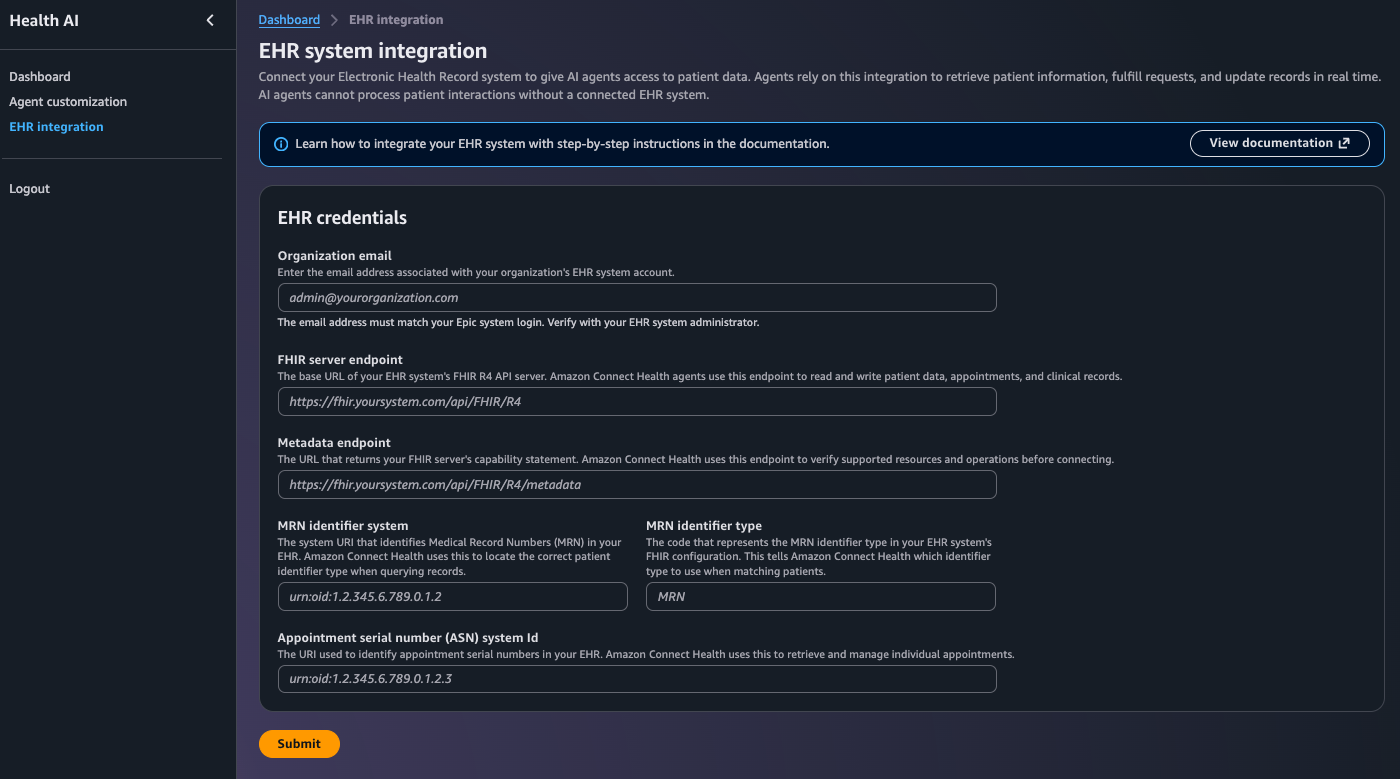
Configuration fields
The following fields are required to configure the Epic EHR integration in the Amazon Connect Health console:
| Field | Description | Example |
|---|---|---|
|
Organization Email |
Administrative email address associated with the Epic environment |
|
|
FHIR Server Endpoint |
Base URL of the Epic FHIR R4 API endpoint |
https://epic_xyz.xxyy.com/FhirProxy/api/FHIR/R4/ |
|
Metadata Endpoint |
URL used to retrieve OAuth 2.0 server metadata |
https://epic_xyz.xxyy.com/FhirProxy/api/FHIR/R4/metadata |
|
MRN Identifier System |
System URI used to identify MRN values within Epic |
urn:oid:1.2.840.114350.646473.0 |
|
MRN Identifier Type |
Code used to classify the MRN identifier |
MR |
|
Appointment Serial Number (ASN) |
Identifier system used for appointment serial numbers within Epic |
urn:oid:1.2.840.114350.1.13.0.1.7.2.798268 |
Pre-production testing
Testing must occur in a non-production Epic environment using mocked patient data only. Do not use real PHI in the UAT environment. The non-production environment has full feature parity with production.
Testing checklist
-
❏ Application successfully activated in non-production Epic
-
❏ Authentication working with JKU URL
-
❏ All FHIR resources accessible
-
❏ All Epic private APIs responding correctly
-
❏ End-to-end patient appointment flow tested
-
❏ Error handling validated
-
❏ Performance benchmarks met
-
❏ Team trained on configuration and troubleshooting
Production deployment
Complete all pre-production testing and resolve any issues before deploying to production.
Pre-deployment checklist
-
❏ Pre-production testing completed successfully
-
❏ All issues from testing resolved
-
❏ Production JKU URL received from AWS
-
❏ Production Client ID documented
-
❏ Rollback plan prepared
-
❏ Support team briefed
Production configuration steps
-
Request production activation from your AWS account team if not already obtained.
-
Activate the Amazon Connect Health application in your production Epic environment using the production Client ID.
-
Configure OAuth2 authentication with the production JKU URL provided by AWS.
-
Enable all FHIR resources and Epic private APIs in the production environment.
-
Create and configure the production backend EMP user with appropriate security points.
-
Update EHR credentials in the Amazon Connect Health console with production values.
-
Perform smoke tests to verify authentication, API connectivity, and basic appointment queries.
-
Monitor the integration closely during initial production use.
