Blender
Blender is a free and open-source 3D computer graphics software toolset used for creating animated films, visual effects, art, 3D printed models, motion graphics, interactive 3D applications, virtual reality, and computer games. Blender is supported by AWS Deadline Cloud (Deadline Cloud) with comprehensive integration including submitters, conda packages, and an adaptor for increased rendering performance. This guide provides step-by-step instructions for using Deadline Cloud with Blender to render your projects faster by distributing rendering tasks across multiple machines.
Support overview
Blender is supported by the following components:
-
Submitter: Integrated submitter for direct job submission from Blender with automatic scene and asset detection.
-
Conda packages: Deadline Cloud for automatic installation on service-managed fleets.
-
Adaptor: Middleware for efficient rendering with sticky sessions and additional monitoring.
-
Cross-platform compatibility: Submitter support for Windows, macOS, and Linux with worker support for Windows and Linux with automatic path mapping.
Blender version compatibility
The following table shows current support levels for Blender versions:
| Major Version | Submitter Support | Conda Support | Render Engines |
|---|---|---|---|
| 3.6 | Windows, macOS, Linux | Linux | Cycles, Eevee, Workbench |
| 4.2 | Windows, macOS, Linux | Linux | Cycles, Eevee, Workbench |
| 4.5 | Windows, macOS, Linux | Linux | Cycles, Eevee, Workbench |
| 5.0 | Windows, macOS, Linux | Linux | Cycles, Eevee, Workbench |
| 5.1 | Windows, macOS, Linux | Linux | Cycles, Eevee, Workbench |
Deadline Cloud Conda Channel
The following table lists all conda packages applicable to Blender available to Service-managed fleets in the deadline-cloud conda channel:
| OS | Package | Version | Notes |
|---|---|---|---|
| Linux | blender | 3.6 | Includes all built-in render engines |
| Linux | blender | 4.2 | Includes all built-in render engines |
| Linux | blender | 4.5 | Includes all built-in render engines |
| Linux | blender | 5.0 | Includes all built-in render engines |
| Linux | blender | 5.1 | Includes all built-in render engines |
| Linux | blender-openjd | Includes the Blender Adaptor |
Getting started
To use Blender with Deadline Cloud:
-
Create a service-managed fleet and associate it with a queue. Your queue must be set up with a queue environment that supports the deadline-cloud conda channel. For more information, see Creating a queue environment.
-
Install the Deadline Cloud monitor and Blender submitter on your artist workstation using the Deadline Cloud monitor and submitter installers. For more information, see Set up your workstation.
-
Submit your job directly from Blender using the integrated submitter to the queue.
-
Monitor the job and download the output using the Deadline Cloud monitor.
Installation
To install the Deadline Cloud for Blender submitter, you need:
-
A Windows, macOS, or Linux workstation.
-
Blender 3.6 or later.
There are three ways to install the Deadline Cloud for Blender submitter:
-
Using the Deadline Cloud submitter installer (recommended).
-
Installing the submitter from Blender.
Using the Deadline Cloud submitter installer
You can install the Deadline Cloud for Blender submitter using the Deadline Cloud submitter installer.
To install the submitter
-
Download the Deadline Cloud submitter installer.
-
Run the installer.
-
When prompted, select each version of Blender you want to use the submitter with.
-
-
Launch Blender.
-
Verify the installation by checking the Render menu for a Submit to Deadline Cloud option.
If the add-on is not available from the Render menu, you need to manually enable it.
To manually enable the submitter add-on
-
On the Edit menu, choose Preferences….
-
Choose File Paths on the left side bar.
-
Find the Script Directories section and choose +.
-
For Name, enter
python. -
For Path, enter the path to the
pythondirectory in your Blender submitter installation. -
Restart Blender for changes to take effect.
Installing the submitter from Blender
Note
This feature is experimental and subject to change.
You can install and update the Blender submitter from within Blender using Blender's extension feature.
To install the Blender submitter using Blender extensions, you need:
-
Blender 4.2 or later.
-
A workstation with consistent internet access.
To add the Blender submitter as an extension
-
Open Blender.
-
On the Edit menu, choose Preferences….
-
Choose Get Extensions on the left side bar.
-
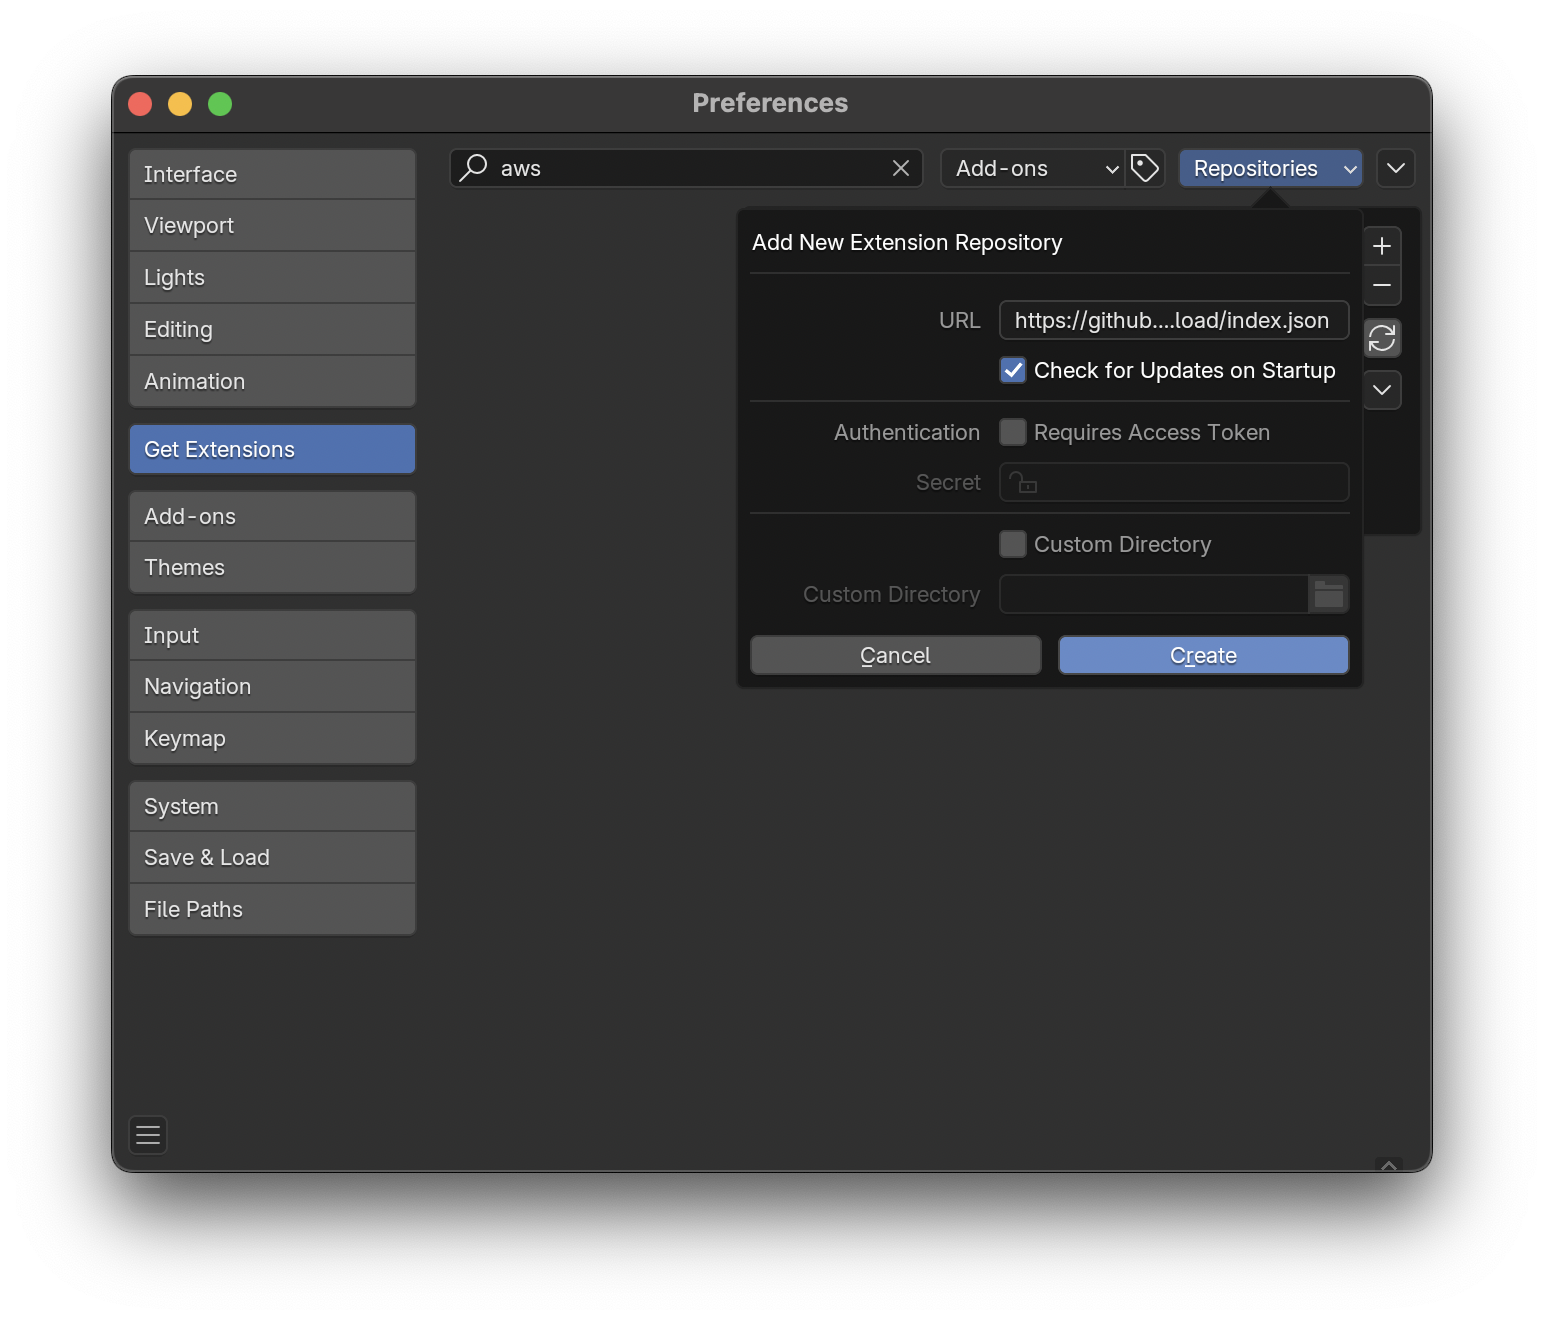
Choose Repositories, +, Add Remote Repository.
-
For URL, enter
https://github.com/aws-deadline/deadline-cloud-for-blender/releases/latest/download/index.json. -
Select Check for Updates on Startup and choose Create.
-
On the Deadline Cloud entry under Available, choose Install.

The add-on is now installed. You can use the new Submit to Deadline Cloud option in the Render menu.
When an update is available, an Update button appears next to the Deadline Cloud entry in the Get Extensions section.
Using the Blender submitter
To use the Deadline Cloud for Blender submitter, you need:
-
A profile to submit to Deadline Cloud with.
-
An Deadline Cloud farm and queue to submit to.
Submit a job
To submit a job from Blender to Deadline Cloud
-
Save your Blender file.
-
On the Render menu, choose Submit to Deadline Cloud.
-
You might see a pop-up to install GUI dependencies. Choose OK and wait for the dialog to disappear, then choose Submit to Deadline Cloud again.
-
-
Use the tabs in the dialog to customize your job.
-
(Optional) To export a job's associated files to your job history directory without submitting it, choose Export bundle.
-
Choose Submit and follow the prompts to send your job to Deadline Cloud.
Blender-specific settings
The Job-specific settings tab has options specific to jobs created in Blender.

-
Project Path - The location where the current project is saved. This value can't be changed.
-
Output Directory - The location to save file outputs from the render job.
-
Output File Prefix - The pattern to use when naming file outputs, follows Blender's convention for file names. Output files are formatted like
[LayerName]_[CameraName]_[OutputPrefix].[EXT]. -
Scene - The scene from the current project to render.
-
Render Engine - The render engine (Cycles, EEVEE, or Workbench) to use.
-
View Layers - The layer to render, or "All Renderable Layers" to render each applicable layer in the scene separately.
-
Cameras - The camera to render, "All Renderable Cameras" to render each camera in the scene separately, or "Use Default Camera" to use the scene's default camera or cameras bound to timeline markers.
-
Cycles GPU Rendering - Whether to enable GPU rendering. Choose a device type supported by Blender or specify your own. If this device type is not supported on your rendering machine, the adaptor attempts to use a compatible device type before falling back to CPU rendering.
-
Override Frame Range - Select this option to render a different frame or frame range than is set in the scene file. Frame ranges follow the Open Job Description
pattern.
For information about the other submitter tabs, see the Deadline Cloud guide for using a submitter.
Advanced configurations
Using unsupported versions
Deadline Cloud only supports and tests the workstation and worker software versions in the table above. When using the submitter, the worker will attempt to install the same version as used on the workstation. This installation fails if the workstation version of Blender does not appear in the version table above.
If you require an unsupported version of Blender, you have the following options:
-
When submitting the job from Blender, you can override the CondaPackages queue parameter to specify a supported version to use on the worker (for example,
blender=4.5, blender-openjd=*). This override might or might not work, depending on the features used by your scene and how Blender works with scenes from your workstation version. -
You may build a custom conda recipe and channel for your desired version to be installed on the worker. Use the conda recipe for a supported version linked below as a starting point, and package your desired version in a custom conda channel. For more information about creating custom conda channels, see Creating custom conda channels.
Blender add-ons
You can make Blender add-ons available on service-managed fleet workers by building a conda package from a conda recipe and adding it to a custom conda channel. When the conda environment activates on a worker, the add-on is installed through Blender's API; when it deactivates, the add-on is removed. For more information about custom conda channels, see Creating custom conda channels.
The following conda recipes are available as starting points:
-
FLIP Fluids add-on conda recipe
packages the demo version of the FLIP Fluids liquid simulation add-on. -
Blender add-on bundle conda recipe
packages multiple Blender add-ons from a single archive so that they install together when the conda environment activates.
Blender render engines
Blender includes several built-in render engines that are supported:
| Render Engine | Description | GPU Support | Notes |
|---|---|---|---|
| Cycles | Physically-based path tracer | GPU/CPU hybrid | Production quality rendering with GPU acceleration |
| Eevee | Real-time render engine | GPU optimized | Fast viewport and final rendering |
| Workbench | Solid shading engine | GPU optimized | For modeling and sculpting workflows |
All render engines are automatically detected and configured by the Blender integrated submitter. GPU acceleration is available when using service-managed fleets with GPU-enabled instances.
Open source resources
The submitter and adaptor are open source and available on GitHub:
-
Blender conda recipes
are available on GitHub for supported versions.
