Autodesk VRED
Autodesk VRED is a professional 3D visualization and virtual prototyping software that brings complex 3D data to life in a realistic virtual environment. VRED is widely used by designers and engineers to create product presentations, design reviews, and virtual prototypes, particularly in the automotive industry. Use this guide to render with Deadline Cloud and Autodesk VRED by distributing tasks across multiple machines.
Support overview
VRED is partially supported by Deadline Cloud with the following components:
-
Submitters: Integrated submitters for direct job submission from VRED Pro with automatic scene and asset detection.
-
Conda packages: Automatic installation on service-managed fleets for Linux workers using the vredcore package.
-
Cross-platform compatibility: Submitter support for Windows with worker support for Linux with automatic path mapping. (VRED Conda packages are available for Linux only; Windows workers require manual installation.)
-
BYOL Licensing: VRED requires Bring Your Own License (BYOL). Unlike some other DCC applications in Deadline Cloud, usage-based licensing is not available for VRED. You must have valid VRED licenses available for your render farm fleet and configure your license server to be accessible from your workers.
VRED version compatibility
The following table shows current support levels for VRED versions:
| Major Version | Submitter Support | Conda Support | Usage-Based Licensing |
|---|---|---|---|
| 2026 | Windows | Linux | BYOL required |
| 2025 | Windows | Linux | BYOL required |
Deadline Cloud Conda Channel
The following table lists all conda packages applicable to VRED available to Service-managed fleets in the deadline-cloud conda channel:
| OS | Package | Version | Notes |
|---|---|---|---|
| Linux | vredcore | 2025 | VRED Core for Linux |
| Linux | vredcore | 2026 | VRED Core for Linux |
Requirements
To use VRED with Deadline Cloud, you need:
-
VRED Pro or VRED Core 2025/2026 with valid licensing
-
Python 3.11 or higher
-
NVIDIA GPU driver 553.xx (recommended for optimal performance)
-
Valid VRED licenses accessible from your render farm fleet
-
Optionally: ImageMagick static binary for tile assembly when using region rendering with raytracing
Important
VRED integration requires bring your own licensing (BYOL). You must have valid VRED licenses available for your render farm fleet and configure your license server to be accessible from worker nodes. For more information, see Connect service-managed fleets to a custom license server.
Getting started
To use VRED with Deadline Cloud:
-
Create a service-managed fleet and associate it with a queue. Ensure your fleet has access to your VRED license server.
-
Install the Deadline Cloud monitor and VRED submitter on your artist workstation using the Deadline Cloud Submitter and monitor installers. For more information, see Set up your workstation.
-
Open VRED and load your scene file.
-
Submit your job directly from VRED using the integrated submitter by selecting Deadline Cloud > Submit to Deadline Cloud from the menu.
-
Monitor the job and download the output using the Deadline Cloud monitor.
Installation
To install the Deadline Cloud submitter for Autodesk VRED, prepare the following environment:
-
Windows 10+ workstation.
-
VRED Pro 2025 or 2026 installation.
-
Python 3.11 or higher.
-
Access to an Deadline Cloud farm with either:
-
A service-managed fleet with VRED software and licensing configured.
-
A customer-managed fleet with VRED and licensing set up.
-
Important
Deadline Cloud for VRED requires bring your own licensing (BYOL). You must have valid VRED licenses available for your render farm fleet.
Installing the submitter
The Autodesk VRED submitter plugin allows you to submit jobs to Deadline Cloud directly from within VRED. To install the submitter:
-
Download the Deadline Cloud submitter installer.
-
Run the installer and follow the on-screen instructions.
-
Open VRED Pro.
-
Choose Edit > Preferences.
-
In the Preferences window, select General Settings, and then choose Script.
-
Clear Enable Python Sandbox.
-
In the Script section, add the following text to the end of the section:
from DeadlineCloudForVRED import DeadlineCloudForVRED DeadlineCloudForVRED() -
Choose Save.
-
Restart VRED Pro. When VRED opens, the Deadline Cloud menu displays in the menu bar.
For manual installation or developer workflows, see the manual installation instructions in the GitHub repository
Updating the submitter
To update the submitter to the latest version, download and run the latest submitter installer.
Using the Autodesk VRED submitter
Before you use the Deadline Cloud submitter for VRED, make sure that your farm has a VRED-capable fleet configured and that the submitter is installed. You also need to authenticate with Deadline Cloud monitor or provide AWS credentials through a configuration profile.
Submitting a job
To submit a job from VRED to Deadline Cloud
-
Save your VRED scene file.
-
In VRED's menu bar, choose Deadline Cloud > Submit to Deadline Cloud.
-
If you have not already authenticated with Deadline Cloud, choose Log in and authenticate using your credentials in the browser window that appears.
-
Use the tabs in the dialog to customize your job.
-
(Optional) To export a job's associated files to your job history directory without submitting it, choose Export bundle.
-
Choose Submit and follow the prompts to send your job to Deadline Cloud.
Shared job settings
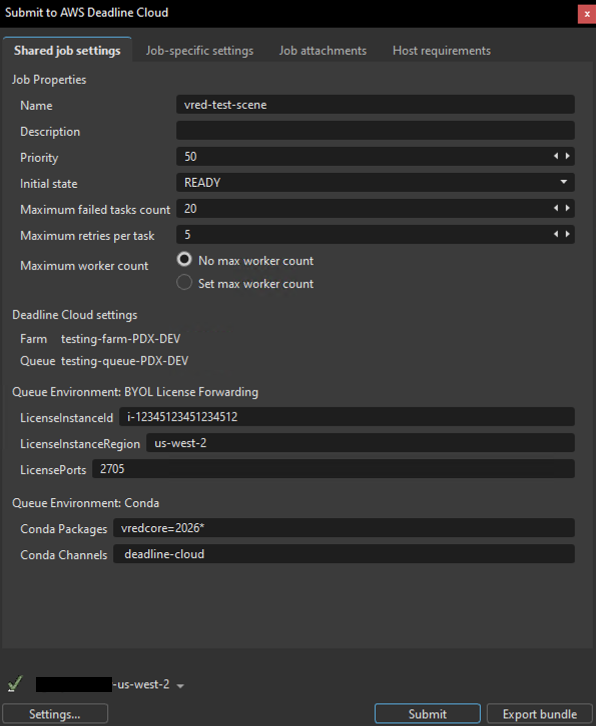
These settings apply to the entire job:
-
Name - A descriptive name for your render job.
-
Description - Optional details about your render job.
-
Priority - Job priority for queue management (default: 50).
-
Initial State - Whether the job starts immediately (READY) or remains paused.
-
Maximum failed tasks count - Maximum tasks that can fail before the job is marked as failed (default: 20).
-
Maximum retries per task - How many times a failed task will be retried (default: 5).
-
Maximum worker count - Maximum workers that can process this job simultaneously.
-
Farm - The farm where your job will render.
-
Queue - The specific queue within your chosen farm.
-
Conda Packages - Conda packages for the job environment (automatically configured for your VRED version).
-
Conda Channels - Conda channels for package resolution.
VRED-specific settings
The Job-specific settings tab contains render options specific to VRED.
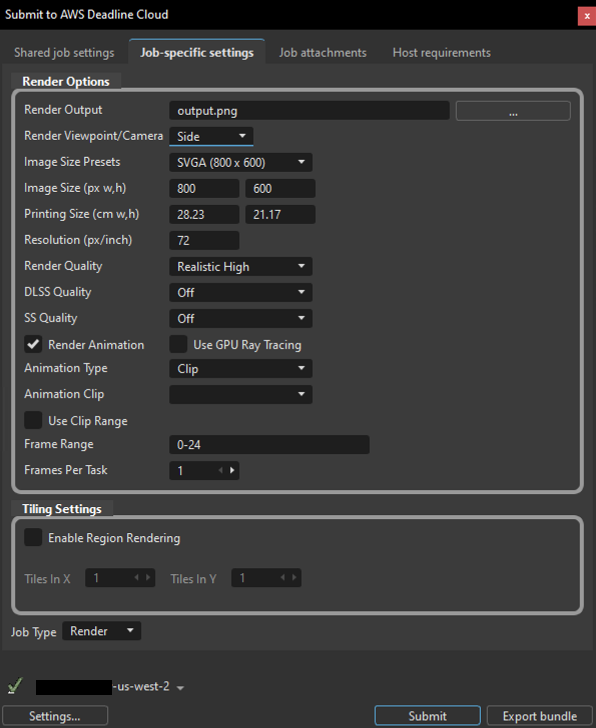
Render options
-
Render Output - The output file path and base filename for rendered images. Use the browse button (...) to select the output directory and specify the filename.
-
Render Viewpoint/Camera - Select which viewpoint or camera to render from. The dropdown lists all available viewpoints in your scene.
-
Image Size Presets - Quick selection of common image dimensions (for example, SVGA 800x600, HD 1080, 4K).
-
Image Size (px w,h) - Width and height in pixels for the rendered output. These values update automatically when you select a preset, or you can enter custom dimensions.
-
Printing Size (cm w,h) - Physical print dimensions in centimeters. This value is linked to image size and resolution.
-
Resolution (px/inch) - Dots-per-inch (DPI) setting that affects the relationship between image size and printing size (default: 72).
-
Render Quality - Quality preset for rendering. Options include:
-
Analytic Low/High
-
Realistic Low/High
-
Raytracing
-
Non-Photorealistic (NPR)
-
-
DLSS Quality - NVIDIA Deep Learning Super Sampling quality level (Off, Performance, Balanced, Quality, Ultra Performance). Requires compatible NVIDIA GPU.
-
SS Quality - Super Sampling anti-aliasing quality (Off, Low, Medium, High, Ultra High). DLSS overrides this setting when enabled.
-
Render Animation - When enabled, renders an animation sequence instead of a single frame. Reveals additional animation options.
-
Use GPU Ray Tracing - Enable GPU-accelerated raytracing for higher quality renders. Requires compatible GPU hardware.
-
Animation Type - Type of animation to render (Clip or Timeline). Visible when Render Animation is enabled.
-
Animation Clip - Select which animation clip to render from the dropdown. Visible when Animation Type is set to Clip.
-
Use Clip Range - When enabled, uses the frame range defined in the selected animation clip.
-
Frame Range - Start and end frames to render (for example,
0-24). You can specify a custom range or use the clip's range. -
Frames Per Task - Number of consecutive frames each worker renders per task (default: 1). Higher values improve rendering efficiency by reducing task initialization overhead, but provide less granular progress tracking. For example, with Frames Per Task set to 5, Task 1 renders frames 1-5, Task 2 renders frames 6-10, and so on.
Tiling settings
Region rendering (tiling) divides each frame into smaller tiles that render independently as separate tasks, then assembles them into the final image. Tiling can improve performance for large, complex renders.
-
Enable Region Rendering - Enables tile-based rendering. When enabled, Use GPU Ray Tracing is automatically activated.
-
Tiles In X - Number of horizontal tile divisions (default: 1).
-
Tiles In Y - Number of vertical tile divisions (default: 1).
Important
Region rendering requires Use GPU Ray Tracing to be enabled. Scene files must be properly configured for ray tracing (such as having sufficient lighting) to produce correct output. Using region rendering on scenes not set up for ray tracing will produce solid black tiles.
Tile assembly requirements: Region rendering requires ImageMagick to be available in the rendering environment for assembling tiles into the final image. One way to provide ImageMagick on service-managed fleets is to add the imagemagick conda package (for example, from the conda-forge channel) to your queue environment. For detailed instructions on configuring conda packages, see Configure jobs using queue environments.
Job type
-
Job Type - Select the type of job to submit:
-
Render - Renders images or animation frames from the scene (default).
-
Sequencer - Executes VRED Sequencer workflows defined in your scene.
-
For information about the other submitter tabs (Job attachments, Host requirements), see the Deadline Cloud guide for using a submitter.
Advanced configuration
Using unsupported versions
Deadline Cloud only supports and tests the workstation and worker software versions in the table above. When using the submitter, the worker will attempt to install the same version as used on the workstation. This installation fails if the workstation version of VRED does not appear in the version table above.
If you require an unsupported version of VRED, you can build a custom conda recipe and channel for your desired version to be installed on the worker. Use the conda recipe for a supported version linked below as a starting point and package your desired version in a custom conda channel. For more information about creating custom conda channels, see Creating custom conda channels.
VRED render engines
VRED supports the following render engines for Deadline Cloud jobs:
| Render Engine | Description | GPU Support | Notes |
|---|---|---|---|
| OpenGL | Real-time renderer | GPU optimized | Interactive visualization |
| Raytracing | High-quality renderer | GPU/CPU hybrid | Production quality rendering |
Open source resources
The submitter and adaptor are open source and available on GitHub:
-
VRED Conda recipes
are available on GitHub for supported versions.
